.comment-link {margin-left:.6em;}

Esurientes - The Comfort Zone

Friday, September 30, 2005

Meme: The best in the last 30


I have been tagged for one of the memes flying around at the moment; the MEME with 2 tails by Beau of Basic Juice. This meme is for both Foodies and Winos....and for us foodbloggers, it is to mention the most wine friendly dish I have had in the last 30 days.
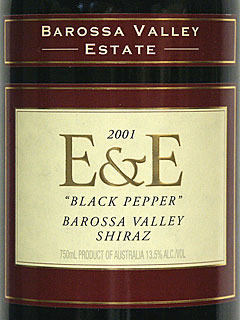
Well, I can do that. But I'm also going the wino route and describing the wine I had with the perfect wine-friendly meal. I came home from a long, hard day at the library ;-) and knew I needed a steak for dinner. A big hunk of red meat with a big glass of big, Aussie red wine. Our cellar is next to the garage, so it's the perfect spot to grab something on your way in, and I reached for the usual everyday quaffing stuff. But then stopped myself. No, tonight called for something better. And bigger. My eyes fell on a bottle my friends gave me for my birthday. Apparently when I went to their place for roast beef last year, I requested a big, ballsy shiraz and I loved what they served; A 2001 E&E 'Black Pepper' shiraz from Barossa Valley Estate. So, they bought me a bottle for my birthday. (I get to pay them back by being one of their bridesmaids for their wedding on Sunday) :-) I believe in enjoying good wines on your own, with just 1 or 2 other people. So many people keep good wines for that "special occasion", and in my experience special occasions are full of too many distractions to really enjoy the wine. Good wine is better in a relaxed situation, with food you make yourself.

My first sip nearly blew me away. This is some damn fine wine. It's huge! Very big flavours, lots of black pepper (funny that), and just perfect with the big hunk of very rare steak I had for dinner. This is the type of wine style people mean when they talk about big Aussie shiraz.
It reminds me of when our Italian relatives came to visit a few years ago. We made a point of serving them some excellent Australian red wines...and watched in disbelief as they diluted them with mineral water, claiming they couldn't tolerate the strength!!! I, on the other hand, find Italian and French wines a bit anaemic and lacking flavour, so this one is my perfect sort of red.

So, I just looked this wine up and was horrified to see that it retails for about AUD $75!!! Goodness me. And there I was drinking it on my own on a worknight with a piece of steak. I'm quite pleased I hid it in the cupboard when somebody turned up, and opened up a cleanskin instead...no way I was sharing that one.
So, for a wine that is the best thing to have with a piece of bloody, rare porterhouse steak, and some simply grilled zucchini sprinkled with home-dried oregano - and big old dollop of Dijon mustard on the side....this is your wine.


Continue reading

Wednesday, September 28, 2005

Supremely Decadent Chocolate Cloud Cake


Ooooh yes. This is one mother of a decadent cake. There is literally nothing in it but dark chocolate, butter, eggs and a little sugar. And a heck of a lot of cream. Serious amounts of cream. Mmmmmm....
This was a last minute addition to the spread at the hen's party afternoon tea a few weeks, and was easily the most popular dessert item. I mean, a party of 25 women? A dense chocolately cake covered in whipped cream? Sheesh, just try to fight the women for that! Those and the dark chocolate custard tarts....
It was actually kind of funny to watch the deliberations and expressions on people's faces:
"Oooohh....I know I shouldn't. I'm trying to go low-carb at the moment. You know, foods with a low GI rating...but that really does look good....."
Hey, I can sympathise: I'm trying to do the same thing. Heck, I haven't had a potato in months. But, let's be realistic here; it's a hen's party. An afternoon of pure fun and indulgence.

Eat the cake.

I mean, just look at it.......

I could have projected the thought, but I just gave them the eye and instructed them to eat it. Sometimes you just need a bossy person to tell you to throw caution to the wind.

So, most of them lost (or won?) their internal battle and ate the cake, and phwoarrrr, it was a good feeling. The bitter intensity of the dark chocolate and the relief of the great snow drifts of softly whipped cream. Yes, very rich - only small slices needed. And I smiled at their showers of laud and honour for my baking skills because this is really one damn simple cake to make. It doesn't require any special skills, ingredients, techniques or equipment, but creates such a huge impression. Apparently you can add a block of chocolate to the whipped cream to make a chocolate whipped cream topping....can you imagine how rich that would be??!

I added the optional orange flavourings to the recipe which gave it a really pleasant hint of orange. It was a less intense flavour than my previous flourless chocolate orange cake, but still worked really well with the dark chocolate. I think this is a cake that Plum would swoon over. I know I watched my friend's mother nearly fall over sideways at her first bite. :-)
Read on for the recipe:


There are recipes all over the place for this sort of flourless fallen chocolate souffle cake, including a fabulous sounding version in my newly acquired "Chocolate & the art of low fat desserts" by Alice Medrich, which I hope to make soon. But I used the version published by Nigella in...one of her cookbooks I don't have. But it's easily available on her website.

Chocolate Cloud Cake (click on the link for US measurements)
Nigella Lawson

The cake itself is as richly and rewardingly sustaining: a melting, dark, flourless, chocolate base, the sort that sinks damply on cooling; the fallen centre then cloudily filled with softly whipped cream and sprinkled with cocoa powder. As Richard Sax says 'intensity, then relief, in each bite'.


Ingredients:
250g dark chocolate, minimum 70% cocoa solids

125g unsalted butter, softened
6 eggs: 2 whole, 4 separated
175g caster sugar
2 tablespoons Cointreau (optional)
grated zest of 1 orange (optional)
23cm springform cake tin

for the cream topping:
500ml double cream
1 teaspoon vanilla extract
1 tablespoon Cointreau (optional)
half teaspoon unsweetened cocoa powder for sprinkling


Preheat the oven to 180ºC/gas mark 4.

Line the bottom of the cake tin with baking parchment.

Melt the chocolate either in a double boiler or a microwave, and then let the butter melt in the warm chocolate.

Beat the 2 whole eggs and 4 egg yolks with 75g of the caster sugar, then gently add the chocolate mixture, the Cointreau and orange zest.

In another bowl, whisk the 4 egg whites until foamy, then gradually add the 100g of sugar and whisk until the whites are holding their shape but not too stiff. Lighten the chocolate mixture with a dollop of egg whites, and then fold in the rest of the whites. Pour into the prepared tin and bake for 35-40 minutes or until the cake is risen and cracked and the centre is no longer wobbly. Cool the cake in its tin on a wire rack; the middle will sink as it cools.

When you are ready to eat, place the still tin-bound cake on a cake stand or plate for serving and carefully remove the cake from its tin. Don't worry about cracks or rough edges: it's the crater look we're going for here. Whip the cream until it's soft and then add the vanilla and Cointreau and continue whisking until the cream is firm but not stiff. Fill the crater of the cake with the whipped cream, easing it out gently towards the edges of the cake, and dust the top lightly with cocoa powder pushed through a tea-strainer.
Serves 8-12

A Niki Note: Don't whip your cream too early, as it tends to deflate and not hold its shape and want to run off the sides, which really isn't the effect we're going for here. I had to scrape off nearly half and whip mine again just before serving because I'd tried to be too organised and whipped my cream first thing in the morning.


Continue reading

Monday, September 26, 2005

IMBB19: Persian lentil broth with fried onions and lime


This month's Is My Blog Burning, hosted by Becks & Posh has a really interesting theme of 'trick someone to eat a Vegan meal'. I was left thinking, "geez vegan..what the hell can I make?!" I don't know why I thought this, when I eat entire meals sans animal prodcuts a lot of the time. For some reason I have a real mental block between vegetarian and that step to vegan. Vegan conjured up images of the hessian-clad, beaded students who hang around the food co-op at my uni and eat beans and dandelion tea. Somehow I imagined that cooking vegan would involve multi-evening preparations of soaking and sprouting legumes, and that I wouldn't have time to make an entry. And I don't know why I thought this. Was I confusing veganism with Michelin starred sauces, perhaps??

But, then out of nowhere I remembered a recipe I clipped out of a Gourmet Traveller magazine about 3 years ago. I had a feeling it was vegan (well, it had lentils in it, didn't it??), and if it wasn't I could alter it to make it vegan (see previous post for my inability to follow recipes...)

Gratifyingly, it was completely vegan and I cooked it up for my dinner tonight. Essentially it's a light, tomatoey lentil broth, spiced with cumin and coriander seeds and sparked up with fresh coriander and lots of lime juice. I really enjoyed it, particularly as I really needed light, refreshing flavours tonight after a weekend of leisurely cooked breakfasts, kebabs and cakes in Canberra.

I thought I had the brown lentils called for in the recipe, but no. No, I have two bags of red lentils, but no brown. So, I used red lentils. I also used canned tomatoes instead of fresh (it is the end of winter here...) and bottled lime juice rather than fresh (see previous point. Plus limes always cost an absolute fortune, even in summer!) (Goodness, there are a lot of brackets in this post...) And right at the end, instead of spending time frying up another onion, I used some of the crispy fried onion you can buy in packets at Asian grocery shops. None of these substitutions seemed to have an adverse effect on the recipe, and I really enjoyed it. It's not a thick, hearty, meal-in-a-bowl lentil soup, this one, but a light, refreshing meal. Nigella Lawson would call it Temple Food. I think it's perfect for a hot climate...or a body in need of a cleansing tonic.

As for tricking someone; I offered my mum a bowl of this and I think she had some and enjoyed it. However, I don't think she'd be put off by the fact it is vegan. It's just a lovely recipe that anyone would make, vegan or not! I'd happily make it for a dinner party of the most enthusiastic carnivores without any qualms.
Actually the tricking may be destined for me;I actually used cumin seeds, which long-time readers know is my most HATED, REPULSIVE thing around. It seriously smells like dirty underpants that haven't been washed!!!! But, I was a dutiful recipe follower and added the teaspoon of cumin, all the while holding my nose. And, you know, yes I could detect the cumin in the soup but it wasn't so awful. I actually could tolerate it without thinking of the toilets at my all-girls' high school. Yes, I may have even tricked myself into enjoying cumin...... :-)
Read on for the recipe:


Persian Lentil Broth with fried onions and lime
Olive oil, for cooking
1 onion, diced
1 tablespoons chopped coriander stalks
1 teaspoon coriander seeds, ground (preferably in a mortar & pestle, rather than ready-ground)
1 teaspoon cumin seeds, toasted
2 x 5mm slices fresh ginger
1 long red chilli, sliced
1 cup brown (or red) lentils
2 flavoursome tomatoes, peeled and chopped (or 1 can diced tomatoes)
8 cups (2 litres) water
juice 4 limes (~3 tablespoons lime juice)
1 onion, sliced (or a few spoons of crispy fried onions)
1/4 cup coriander leaves

Heat 2 tablespoons of olive oil and gently cook the onion and garlic until soft. Add the coriander stalks, ground coriander seeds and cumin seeds and cook for another minute. Add the ginger, chilli, lentils, tomatoes and water. Bring to the boil, reduce heat then simmer, partly covered for 10-15 minutes, skimming off any froth, until the lentils are tender.
Remove from heat. Discard the sliced ginger. Add the lime juice and season the soup with salt to taste (I found it needed quite a bit of salt for my taste). Quickyl brown the sliced onion in a hot pan with a little olive oil. Serve the soup in hot bowls and the fried onion and coriander leaves to add separately.
Serves 4.


Tagged with: +


Continue reading

23rd post meme - delving into the archives

Crash hot potatoes

I was tagged by Augustus Gloop at Grab Your Fork for this fun meme. I tend not to participate in many memes, as I get busy enough doing my own posts, but this one involved looking into your own archives and seeing what it throws back.
The instructions are to go into your archives, find your 23rd post, and then find the 5th sentence and post it again.

Easy. My 23rd post was from December last year for Jill Dupleix's now-legendary recipe for
Crash hot potatoes, which is quite possibly the best way to roast potatoes around. My 5th sentence, like Cathy's, is telling. It follows a sentence where I described how I substituted potato chunks for small, whole potatoes:

I encountered some difficulty when crushing them with the potato smasher as they kept getting all caught up in the prongs, and making a big mush.

This makes me laugh as it reinforces that fact that I have real troubles following a recipe to the letter. And then I wonder why things go wrong....
The idea is that you tap 5 people to follow this meme, but I would prefer to invite any of you who are interested in taking part to give it a go. It's fun to look back at your early posts. If you do participate, do leave a comment so I can take a look!


Continue reading

Thursday, September 22, 2005

Coconut & Lime Macadamia Cake


This is one of the offerings I made for the hen's party afternoon tea last week, and it just happened to fit in exactly with the theme for this month's Blog Party - Tiki theme, invented by Stephanie! What fortuitous circumstances.
This is a Bill Granger recipe from his Bill's Open Kitchen chapter on Afternoon Tea, and it's actually an interesting recipe. It is dairy-free, so good for those who are lactose-intolerant or avoiding butters and fats. It's also almost gluten and wheat free as it only has 1/3 cup of SR flour, and that's only used when crushing the nuts to stop them getting sticky, and could easily be substituted with something else plus some baking powder.
The structure of the cake is made up with coconut and beaten egg whites, and you could almost convince people it was healthy! It's kind of like a big coconut macaroon in cake form. As it was, I used it as my 'healthy' sweet offering for the party....and it just goes to show that at parties full of women, healthy offerings are not what we're looking for. Only one slice was taken, whereas the flourless chocolate cloud cake and chocolate custard tarts disappeared in the blink of an eye!


Don't be tempted to skip the lime icing. We felt the tangyness of the lime juice in the icing is really needed to cut through the fat waxiness of the macadamias in the cake. Next time I would probably add some lime juice to the cake batter just to increase that sharpness and tang.
But with the ingredients of macadamias, coconut and lime, it has impeccable tropical pedigree, and I do hope it is considered a worthy offer for Stephanie's Tiki Party. :-)
PS - No posts for a few days, as I'm leaving in the morning for a long weekend in Canberra, to be a good Australian and visit our national institutions!
Read on for the recipe:


Coconut and Lime Macadamia Cake
from Bill's Open Kitchen

200g (7oz) macadamia nuts
40g (1/3 cup) self-raising flour*
a pinch of salt
6 eggs,separated
165g (3/4 cup) sugar
finely grated zest of 1 lime
45g (1/2 cup) dessicated coconut
lime icing (below)

-Preheat the oven to 180C(350F). Place the nuts, flour and salt in the bowl of a food processor and process until the nuts are ground. Place the egg yolks and sugar in a bowl and beat for 3 minutes, or until the mixture is pale and creamy. Fold through the zest and coconut then the nut mixture. Place the egg whites in a clean, dry bowl and whisk until stiff peaks form. Using a large metal spoon, fold lightly through the nut batter.
-Spread the batter evenly into a 23cm (9 inch) greased or non-stick springform cake tin.
-Bake for 40 minutes, or until the cake is lightly golden.
Remove from the oven and leave to sit for 10 minutes in the tin. Turn the cake out onto a serving plate. Spread the lime icing over the warm cake, allowing it to drizzle down the sides.

Lime Icing
125g (1 cup) icing (confectioners') sugar, sifted
2 tablespoons lime juice
1 teaspoon finely grated lime zest

Combine all the ingredients in a bowl and mix until smooth and glossy.

*If replacing the flour with something else to make it a gluten-free cake, make sure you replace the self-raising aspect of the flour with some type of leavening agent such as baking powder.


Continue reading

Wednesday, September 21, 2005

Vegetable stack


It's like that Kellogs Cornflakes ad: Sometimes the simple things in life are often the best. And when you have a fridge full of red capsicum, early-spring asparagus, rocket lettuce and home-grown zucchini you have the making of such a satisfying dinner. I just grilled all the vegies (bar the rocket!) with a sprinkling of dried oregano (the stuff from Greece dried on silent mountainsides by young virgins...), olive oil and salt flakes. I then made a restaurant-style TOWER! of criss-crossed vegetables layered with some home-made pesto and different types of soft cheese we had (herbed goats cheese - yum! and light cream cheese), some Italian proscuitto for smoky saltiness and a touch of the fab unrefined honey for just that hint of sweetness.
Very satisfying - both in taste and in the knowledge of the goodness of lots of healthy vegetables getting into your body. And very quick to make on a worknight.


Continue reading

Monday, September 19, 2005

Cooking with Altoids: Peppermint Fudge Brownies


So, cooking with Altoids, eh? What the heck? Altoid flavoured chocolate brownies?? What a way to ruin a good brownie! I agree - yes, it sounds like a complete crackpot idea.
Altoids are little chalky mint flavoured lollies from the UK, similar to Fisherman's Friends. They come in many flavours nowdays, but peppermint is the original. The tins are amusingly retro-daggy and apparently very collectable (??). When I saw a feature on the Altoids website a few months ago about Cooking with Altoids I was both amused and interested. It's such an unattractive name; Altoids sound like some type of rheumatism medication or stomach antacid!
See, it's been a year to the day today that I was sailing from Germany to Denmark on tour with my vocal ensemble, and trying to spend leftover euros in the giftshop. One of my fellow altos dragged me over shouting "Look! Look! Lollies for altos!!!" Naturally I had to buy a tin. But, honestly I didn't love them that much, and the tin has sat by my computer monitor for nearly a year.

The recipes using Altoids page (which doesn't seem to exist anymore?) gave suggestions for how to incorporate altoids in cooking; i.e. crushed apple sour altoids to crust a rim of a cocktail glass, or crushed ginger altoids in a stir fry (hmmmm). But what took my fancy was to flavour chocolate truffles with the cinnamon or peppermint flavour. Ooooh - that could be good. Trashy, but good. And how excited was I about getting down and dirty with my mortar and pestle?! What a talking point!

I had a bag of good dark chocolate couverture which would work well with mint, and instead of fiddly truffles, I thought brownies. And my choice of recipe wasn't difficult. Cathy from My Little Kitchen had, our of the sheer kindness of her heart and based on a single comment on her site, sent me a copy of her treasured Maida Heatter's Book of Great Cookies - from which she is cooking every single cookie recipe in an epic 3 year project. Check it out! I was so excited to receive an authentic American cookie-baking book, and it was my constant bedside companion for at least a week, reading through every recipe and making notes of the ones I want to make. So, with my nice chocolate and a new baking book, I chose Maida's Fudge Brownies, which she described as fudgy, moist and candylike. I thought the richness of them would work well with the strong minty flavour of the altoids.

I initially got down and dirty with only 5 Altoids. I didn't know how strongly they'd flavour the mixture and I wanted to go slowly. Couldn't taste a thing, so I crushed another 5. Still nothing. Another 5....now we're getting somewhere. In the end I crushed about 18-20 Altoids, and it gave a really lovely peppermint flavour that complemented rather than overshadowed it the chocolate. And the texture! Whoa! Were these the perfect brownies or what?! Perfect flaky top, perfect chewy, candylike crust and the most perfect gooey, fudgy centre. These were so perfect I can't find any more superlatives. I can only feel relieved that I packed them off with A. to take to his work as the 3rd installment of the baking-for-the-mystery-workplace project because I could have very easily eaten half the tin in one sitting. These are Cathy's next recipe, so I'll be interested to see how they turn out for her.

So, how were they received? Apparently extremely well. Who doesn't like a free chocolate brownie? I think the most cohesive review came from my friend who works in the next building to A. and who gets a sample from him of each batch of baking I send in. She sent me this email after tasting her sample:
"Mmmmm... I'm in crunchy/soft/gooey, minty, chocolatey heaven. Divine! The Altoids work really well - nice mint flavour but not too overpowering. Nice. Very nice.
P.
[her workmate] liked the texture, although says he's not a fan of peppermint and chocolate together because chocolate is such a rich flavour and the peppermint is almost suprising because it's so "clean". Personally I think he's crazy - I've always loved peppermint and chocolate"
I understand where P. is coming from. Usually I feel the same way about chocolate and peppermint, but I'm with my friend on this example. This recipe does peppermint and chocolate really well and I think you'll be in brownie heaven with these. Even without the addition of Altoids. :-)
Read on for the recipe:


Peppermint Fudge Brownies
Based on the Fudge Brownies in Maida Heatter's Book of Great Cookies

Makes 24 brownies

4 ounces/4 squares/125g dark chocolate*
1/4 pound/1 stick/125g butter, cut into large pieces

3 eggs
1/2 cup white sugar*
1/2 cup brown sugar*
1 teaspoon vanilla extract
pinch of salt
3/4 cup sifted plain flour
~20 peppermint Altoids, crushed to a fine powder

handfull small chocolate drops

Place an oven rack 1/3 up from the bottom and preheat to 350F/175C. Line a square or rectangle tin with greasproof paper, and set aside.
Melt the chocolate and butter together (in a double boiler or the microwave) until almost melted. Remove and stir until completely melted and smooth. Set aside to cool slightly.
With an electric mixer beat the eggs at high speed for about 30 seconds until foamy and slightly increased in volume. On low speed gradually add the sugar and beat for only a few minutes to mix. Add the vanilla, salt and chocolate mixture, scraping the bowl with a spatula until only barely mixed. Do no overbeat*. Add the flour & chocolate drops, still scraping the bowl and beating only until mixed. Now gently fold in the Altoids, tasting along the way (bonus!) until you reach the intensity of flavour you desire.
Pour into the pan and smooth the top.
Bake for 35 minutes until a toothpick comes out barely clean. The inside should still be soft. Do no overbake.
Remove the pan from the oven, place it on a rack and let stand for ~1 hour until only barely warm.
It is easier to cut into bars when chilled. It cuts most perfectly after being partially frozen.

*Maida notes: If you overbeat the eggs or the eggs and sugar, it will make the brownies cakelike, spongy and dry instead of moist. [Bleah! So, take note.]

Niki notes: I altered the recipe to take into account the fact that we can't get unsweetened chocolate in Australia, so I used dark and reduced the amount of sugar. I also chose to use half brown and half white sugar to increase the fudginess aspect, which works spectacularly well. And then for pure decadence I added a handful of little chocolate drops. The original recipe calls for the same amount of unsweetened chocolate (4 squares) and 1 1/2 cups of white sugar.


Continue reading

Friday, September 16, 2005

SHF: Dark Chocolate Custard in Almond Shortcrust Tarts


This edition of Sugar High Friday, hosted by Elise of Simply Recipes has the theme of custard. Now, I like custard well enough, but I'm not overly crazy about it. I find it can be a bit goopy and bland tasting for me, but the boyfriend just adores the stuff, and custard was one of the few things that my dad enjoyed cooking for himself. I think it was a comfort food for him, and I have strong memories of him standing by the stove carefully stirring his pan of bright yellow mixture.
I think many people still think that custard comes from a box, and you just add milk and get that lurid orangey/yellow bland-tasting goop. In fact, when talking custard with my Aussie grandmother and I mentioned something about all the egg yolks it needed, she looked surprised and said "What? No custard powder?". No. No custard powder; possibly that's why I'm not such a huge fan of it, having had that experience as a child! :-)
Some years back my mum discovered a recipe for the Italian style custard you make to fill profiteroles, to make a croquembouche, which is her signature cake-making item. It's full of egg yolks and cream, and very thick and rich. It's a million times better than the boxy stuff, and I like it well enough in the little bigne but again I would't want to eat an entire bowl!

I initially didn't think I'd have a chance to enter this edition of SHF, as I knew I'd be pretty flat-out doing stuff for my friend's hen's party (tomorrow!), but when I looked through "Bill Granger's Open Kitchen" and spotted all the biscuit and cake recipes I wanted to make, this was the one my mum specifically requested. She thought something unctious and chocolatey would be good for a group of women, and I heartily agree. The photo of them was gorgeous, and I actually tried to replicate it in my own photo below. After she chose it, I realised it would fit exactly with the SHF theme I had decided I couldn't do. So, don't things work out well?

They're very easy to make, especially as the small amount of cornflour stabilises and thicken the mixture, so you don't have to stand there for years, stirring over a low flame hoping to God that it doesn't split or curdle. The taste is thick, rich and full of bitter dark chocolate and yet this is the short-cut custard version, that still avoids using that box of Custard Powder!

Bill suggested using sheets of frozen puff pastry for the bases, but I was concerned that making them in advance and freezing them would affect the texture of the pastry too much. I knew they wouldn't end up crisp and flaky, so I chose to use the sweet almond shortcrust pastry from the Bakewell Tart in Nigella's How To Eat. And I think the result is so much better than frozen puff pastry. The almond shortcrust has a nice sweetness that cuts through the bitter chocolate custard, and the texture is cake-like and a bit crumbly. It's just a perfect combination. In fact, on Sunday when I made these, A. was spending a quiet day on the couch with a blanket and the Foxtel remote, and I offered one of the tart cases which I'd botched up, in a bowl topped with the still warm chocolate custard. His response:

"Oh no. These are awful! Terrible! You can't serve them up to people. I'd better eat the rest....."
:-)
A ringing endorsement from a real custard fan!

Check out the roundup of all custard recipes here:
Read on for the recipe:


Dark Chocolate Custard in Almond Shortcrust Tarts
Adapted from Bill Granger and Nigella Lawson

Custard:
3 egg yolks
55g (1/4 cup) caster (superfine) sugar
2 tablespoons cornflour (cornstarch)
1 teaspoon vanilla extract
185ml (3/4 cup) cream
125ml (1/2 cup) water
150g (1 cup) dark chocolate, grated or chopped finely

Almond Pastry:
175g plain flour, sifted
50g ground almonds
65g icing sugar
130g butter, diced
1 egg yolk

Make the pastry by hand, in a free-standing mixer or processor as you like. Sift the flour, a pinch of salt, the ground almonds and sugar into the bowl and combine. Add the diced butter and combine. When it looks like fine crumbs add the egg yolk to make a soft, but not sticky dough. Do not overprocess. You may need to add a few drops of ice-cold water if some crumbs of pastry remain at the bottom of the bowl. Wrap the disc of pasty in paper or plastic wrap and let it rest in the fridge for 15-20 minutes.

While it is resting preheat the oven to 200C and make the custard. Place the egg yolks, sugar, cornflour and vanilla into a bowl and whisk until smooth. Add the cream and water and whisk again. Pour into a saucepan and place over the medium heat. Stir until the mixture is thick, about 5 minutes. Remove from the heat, add the chocolate and stir until melted. Leave to cool.

Roll out the cooled pastry and cut into rounds 10cm (4 inches) in diameter - yes, quite large - and place in a 12 cup muffin tin. Place in the oven for about 20 minutes, until golden. Leave to cool and then remove from the tin and fill with the cooled chocolate custard. Dust with icing sugar and serve.

Note: the Bill Granger custard recipe was for 18 tarts, but Nigella's pastry only made enough for 12. You could either cut each pastry round a little smaller, which would work, or do as I did and have bulkily swelling cups full to the brim with custard.


Continue reading

Thursday, September 15, 2005

Sort-of-Thai fishcakes


Well! After getting such a wrap from Zarah Maria in Dining With the Bloggers, I've decided to intersperse my sweet baking-for-the-hen's-party recipes with a savoury creation I made last week and ABSOLUTELY LOVED! Maybe this is another easy savoury dish Zarah Maria can add to her list. ;-)

At rehearsal recently my friend ran in late, apologising for the fishy smell on her hands because she had just made and eaten some fantastic fish cakes for dinner. Before we started singing I managed to get some details out of her; 500g any sort of cheap white fish, some coconut milk, light soy sauce, lots of coriander, sweet chili sauce etc.etc. I thought it sounded great, especially as I really should eat more fish.
So, a few days later I gave it a go. I used some Trevally; my friend used Blue Eye. Both are cheap. I threw it into the food processor and turned it into a paste, then added about 1/4 can of coconut milk (especially that thick, creamy part from the top!) and lots of fresh coriander (cilantro), light soy sauce, some ginger, garlic and a few tablespoons of the homemade sweet chili sauce made by my great-aunt, which we've had sitting in the fridge for ages. I generally don't like sweet chili sauce on its own, on chicken or as a dipping sauce for potato wedges & sour cream (it's too sweet), but combined in these fish cakes, it was spectacular. Then add salt and pepper to taste and blend it up a bit more. I can't remember if I added anything else; perhaps some Thai fish sauce? Maybe not. The whole point of this 'recipe' is that it uses whatever South-East Asian ingredients you probably have laying around the house. At least, many Australian kitchens are now full of Thai/Vietnamese condiments and herbs! So, you can play around with taste combinations. What I really like is that most fish cakes are bulked out with mashed potato or sweet potato - both of which I'm trying to avoid at the moment - but these are not.

The mixture will be sloppy, but that's ok. Just try to shape it into rough balls and then cook. My friend shallow fried hers, but I actually used our in-built deep fryer because a: it's quicker b: it's less messy and c: it's healthier! Yes, I do mean healthier; when you have a good deep fryer, with clean oil at a constant high temperature the food you put in cooks quickly and absorbs extremely little oil - less than shallow frying for a longer amount of time. I find we don't even need to drain food that comes from our deep fryer as it carries so little excess oil. Of course, you could shallow fry in just a little bit of oil; that would still be quite healthy, really!

It's the coconut milk in these fish cakes that really make them something special. They have a sweetness from the milk and sweet chili which really works well with the salty, savoury other ingredients. They are seriously yum, and I've been snacking on them cold from the fridge all week. I'm definitely making these again as soon as I can.


Continue reading

Tuesday, September 13, 2005

Winter Plum Cake


I have actually made this before and posted about it, but not to the correct specifications. It the Winter Plum Cake from Nigella's 'How to be a Domestic Goddess', and it's something I flicked over when I first got my own copy. However, my friend Beck received a copy a few months later and I think this was the first recipe she made in it. She saw something more appealing in the recipe than I did (I was probably focusing on the chocolate recipes...) and I'm glad she did because it's really excellent.
It's a 'winter' plum cake in the sense that it uses tinned plums rather than fresh, and this means you get big chunks of sweet, tangy plum in almost every mouthful. The cake itself is made with brown sugar and some ground almonds, so it's very soft and moist, but still light rather than heavy. It's dead easy to make and it fills your house with the most wonderful aroma of almonds and general cakiness when it's baking.

But the absolute star of this cake is the icing, made with unrefined icing sugar and I have to say, I'm sorry, but if you can't get unrefined icing sugar you cannot substitute plain icing sugar. It's not the same thing. The unrefined sugar is not as harshly sweet as the white powder and has a very distinctive caramel & molasses taste, a bit like brown sugar. When mixed with just a tablespoon of water it turns into absolute toffee bliss. You would never know that plain sugar and water could have so much flavour. And just look at that colour! That's just sugar & water, folks. I know I've written about this topic on a few occasions, but I'm almost evangelical about it! I use the Billington's brand of unrefined sugars, from the UK, which I admit are not available everywhere; I get mine from a local gourmet/European supermarket. From comments on other blogs, I understand that those in the US can't get unrefined icing sugar, but I do stress that substituting white powdered sugar wouldn't work. A soft brown sugar frosting or buttercream could be a good approximation though.

So, this is another offering for the hen's party this week, for which I had a big weekend of baking. And the flowers? Well, Melbourne smells like jasmine at the moment. Wherever I am, when I walk outside I can smell sweetness. I think every jasmine plant in Melbourne has burst into flower during the last week of warm, humid, springtime weather. I, on the other, hand am thoroughly revelling in the return to cold, wind and rain that is the weather this week!
Read on for the recipe:


Winter Plum Cake
from How To Be A Domestic Goddess - Nigella Lawson

567 gram tin red plums
125 grams self-raising flour
1/2 teaspoon baking powder
75 grams ground almonds
125 grams butter, softened
125 grams light brown sugar
2 large eggs
1 scant teaspoon almond essence

20 cm Springform cake tin.

For the icing:
160 grams unrefined icing sugar
1-2 tablespoons hot water

Preheat oven to 170 c.
Drain plums, then chop and leave in a sieve to drain once more. Mix the flour, baking powder and ground almonds. Cream the butter and sugar, then beat in the eggs, adding a tablespoon of the flour mixture after each one. Beat in the almond essence, then fold in the rest of the flour mixture and the drained, chopped plums. Turn into the prepared tin and bake for about 1 - 1 1/4 hours. Remove from ove, cool in its tin for about 10 minutes, then turn onto the rack.
When cool, ice with brown-sugar icing, which you make by mixing the sieved icing sugar with water till you have a caramel-coloured shiny paste. Pour over the top of the cake to cover thinly, and leave to drip down the sides.


Continue reading

Sunday, September 11, 2005

Orange, Cardamom & Brandy Biscuits


In Bill Granger's Book "Bill's Open Kitchen" these are known as Orange & Cardamom biscuits, but after I had a go at them, these were most definitely brandy flavoured. In fact, these smell like Christmas! They taste a bit like a cross between German lebkuchen (gingerbread) and the brandy sauce I make to pour over our pudding. They are seriously good, and even my mum who easily resists nibbling on sweets, kept going back for a few more taste tests.

I've just spent a weekend baking up a storm for my friend's hen's party next Saturday and I finally have a backlog of posts ready. A few weeks ago mum came home with a cheap copy of the Bill Granger book I mentioned. She knew that I wasn't really taken by the hype surrounding him but the book was so cheap that she grabbed it. And I do have to eat my words, because I have been quite taken by his sweets and baking recipes, which are very good. I'm still not completely enamoured of his dinner/lunch recipes because theyr'e a bit too 'Sydney/Gold Coast' - i.e. light, salady, grilled type things you can cook on a BBQ and eat on a verandah. I live in Melbourne. That sort of stuff is not so suitable for us here most of the year! But, he has a chapter on Afternoon Tea in this book, and I've picked up about four recipes that I'm making for the hen's party. That's a good strike rate for one book.

The name of these biscuits didn't grab me at first, but reading through the ingedients sparked my interest: oranges, ginger, nutmeg, cardamom, brown sugar and brandy. Ooooh...that sounds kinda interesting. And the photo looked appetising, so I gave them a go. I had a bit of trouble with the dough being too crumbly, so I had to add more liquid, and I chose that in the form of more brandy. Hey, what kind of hen's party is it without alcohol?? Because of the extra brandy, the biscuits had a fabulous aroma and full, buttery, spicy taste. The cardamom doesn't really come through, but there is a strong taste of ginger and orange.

For the past two years I've made biscuits at Christmas to hand around to friends. Two years ago I made excellent lebkuchen from a recipe I accidentally threw away (bugger. It came from NZ Cuisine magazine, Dec 2003....anyone have one??), and last year I made Jeanne's Dutch spiced wine cookies. This year, I've already decided. I'm making these. They look good and taste bloody awesome! And who can resist a bit of brandy and spice at Christmas?
In fact, these were so good, I even baked the offcuts of dough that weren't worth rolling out again, and I took them to my concert last night, to offer around at interval. I really endorse these to you; give them a go!
Read on for the recipe:


Orange, Cardamom & Brandy Biscuits
from 'Bill's Open Kitchen', Bill Granger

375g (3 cups) plain (ap) flour
2 teaspoons baking powder
1 tablespoon ground ginger
1 teaspoon ground nutmeg (try to grate your own. It's much more aromatic)

1 teaspoon ground cardamom
250g (9 oz) butter, softened

345g (1 1/2 cups) brown sugar
3 teaspoons brandy (I used about 3-4 tablespoons in mine)
finely grated zest of 1 orange
30g (1/4) cup plain flour, extra
1 egg white, for glazing
30g (1/4 cup) granulated sugar

Preheat the oven to 180C (350F)
Sift the flour, baking powder, ginger, nutmeg and cardamom into a large bowl. Place the butter and brown sugar in a bowl and beat until pale and creamy. Add the brandy and zest and mix well. Using a large metal spoon, fold the dry ingredients through in two batches. Sift the extra flour over a clean, dry surface and knead the dough for 30 seconds (I had serious crumbling issues here - splash on the brandy!). Roll the dough into a large rectangle 5mm (1/4 inch) thick. Cut into shapes 3x6cm (1 1/4 x 2/ 1/2 inches) long. Brush with the egg white and sprinkle with sugar.
Place the biscuits 2cm (3/4 inches) apart on a baking tray lined with baking paper. Bake for 10-12 minutes, or until lightly browned. Remove from the oven and cool on a wire rack.
Makes ~40.

Note: Don't overbake these. I cooked mine for 11 minutes, and they are just slightly too hard. Next time I will probably take them out at 9 or 10 minutes and they'll be perfect.


Continue reading

Friday, September 09, 2005

The Research Project: CCCs No. 2


Look at that bit of gooey chocolate, straight from the oven. You want one, don't you.....? :-P
So, most of you are aware of my current research project in which I'm trying to find my perfect choc chip cookie recipe. Although 'perfect recipe' is perhaps not the right idea; I'm trying to find the recipe that best works for me, and gives me exactly the kind of cookie I want; fairly thick, but crispy on the outside and chewy and gooey in the middle. Basically, like the ones you get at Mrs Fields cookies. I know it can be done at home!!
After the post a few days ago I had lots of people leave comments and email me with recipes; thank you! I was very flattered that so many people read the blog and feel interested enough to leave a comment. There are some really interesting recipes and techniques there and I hope to try them all.

So....last night I was in full chef mode. I made some basil pesto, some excellent Thai fish cakes (went freeform there, no recipe!), a dairy-free macadamia, coconut and lime cake (post very soon) and, finally, at 11.30pm on a school night, I decided to whip up another batch of CCCs to take to our dress rehearsal tonight.
The recipe I chose (from the list I now have) was based upon the amount of butter and chocolate I had in the house. I chose the recipe sent to me by Linda, who seems to be quite a culinary perfectionist herself, which she adapted from seeing it on the Food Network, Canada. Her recipe used about 1/2 the amount of butter of others, and specified chocolate chunks rather than chips. I liked that idea, and I used a chunk of dark couverture from Chocolatier. Oh no - no cheap compound chocolate chips for my privileged friends!

The interesting thing about this recipe is the use of some cornflour (cornstarch), which changes the texture in the same way as in a sponge cake - it makes it softer and more tender. All very worthy qualities for my perfect CCC. However, I think my execution of the recipe made them too soft. After 9 minutes I took them out (admittedly I did have the oven lower than than the recipe specified, but I was following instructions from Gaggenau which tells me to lower temperatures by at least 10C), let them sit for a few minutes and tried transferring them to a rack. I had real trouble doing this, as they started falling apart, and then falling through the rack itself! So, I put them back in the oven for a few minutes to firm them up a bit more.

Interestingly, the tasters at rehearsal didn't like this batch as much as the crispy crunchy batch I brought, and wasn't happy with, on Tuesday. They loved the flavour (thank you Stephanie - I did add extra vanilla essence - good idea!), but felt the texture was too soft and flabby and the whole cookie too flat; not enough to sink your teeth into. One person described them as 'very American' (?!). This didn't stop them from eating the whole batch, though! Even flawed CCCs are better than no CCCs!
I do think some of the problem might have been in my execution; the lower oven temperature might have played a part, and also the fact that I didn't use quite as much chocolate as specified. I do think this recipe has promise, though. I really like the use of the cornflour, and I think the addition of some finely ground oatmeal with the cornflour might create the perfect type of texture I'm looking for. I also think I needed to make each cookie larger; more dough in each unit would possibly have made a chunkier cookie. However, whenever I drop a 1/4 cup measure of dough (or whatever is specified) I usually start laughing at the huge American cookie size, and scrape off a bit to resemble a standard Aussie biscuit size. It's also pure stinginess on my part; I want to get as many cookies out of the dough as possible. I need to stop doing this and just damn well follow instructions!!! (what a cathartic process this project will be for me....)

But, onward and upward! More CCCs to come - and my choir friends very excited about acting as tasters and critics for the next batches.
Again, thank you Linda for a very interesting recipe. I like it because it has exercised that scientific part of my brain that analyses the chemistry of food. In fact, this whole research project will do a very good job of that!
Read on for the recipe:


Chocolate Chip Cookies
Recipe By :Kayaksoup adapted from an Anna Olson recipe

Serving Size : 24

3/4 cup (170g) unsalted butter -- softened
1 cup (200g) brown sugar
1/4 cup granulated sugar
1 egg
2 tsp vanilla extract
2 cups (250g) all purpose flour
2 teaspoons cornstarch
1 tsp baking soda
1/2 teaspoon salt
10 ounces (285g) bittersweet chocolate -- cut into chunks

Directions:
1.Preheat oven to 350 F (175C).
2.Cream together butter and sugars until smooth. Add egg and vanilla and blend in.
3.Stir in flour, cornstarch, baking soda and salt.
Stir in chocolate chunks.
4.Drop by tablespoons onto a greased baking sheet and bake for 8-10 minutes, until golden brown around the edges.
5.Let cool slightly and enjoy.
Source: "Sugar"

Linda writes: I found this recipe on Food Network Canada, upped the chocolate slightly and recieved the adulation of friends, family and coworkers. The keys are the cornstarch and the bittersweet chocolate. You can use chips instead of chunks.

Niki writes: I added extra vanilla to this recipe as well as a teaspoon of ground cinnamon, becuase I love the aroma. I also added about 1/4 cup chopped walnuts, which all contributed to an excellent flavour.


Continue reading

Thursday, September 08, 2005

Eggplant Rollatini


More baking soon, I promise. In the meantime, this is an eggplant rollatini that was particularly successful. One night I was watching Lifestyle Food and two shows featuring American-Italian chefs came on one after the other- one was Lidia Bastianich, the other Giada de Laurentiis - and both of them were featuring Italian-American dishes (e.g. spaghetti with meatballs). One dish that they both made caught my eye; an eggplant rollatini. But it wasn't until I went to visit my nonna soon after, and she served up a baked eggplant parmiagiana that I felt compelled to try it myself.

A quick search on Google actually brought up the recipe from Giada's show, which added to my feeling that I was 'supposed' to make this dish! It's extremely easy, and fairly quick to make. Also, and this will attract a few people, it's quite low fat! The only oil used it some cooking spray when grilling the eggplant slices, and the cheese used is low-fat ricotta and a little parmesan and mozarella. This dish is also a good alternative for those wanting to avoid carbohyrdrates or flour; it's comforting and cheesy/tomatoey like lasagna, but with eggplant instead of pasta sheets. I liked it very much.

The eggplant slices are just grilled and then wrapped around a spoonful of filling. Somehow I ended up with far more filling than I needed, so I just poured the excess around the rolled up slices. I think a reason for this is that I used ricotta in a tub, which can be pretty watery. Since then I've discovered fresh ricotta cut from the wheel and IT TASTES SPECTACULAR! Seriously, I never though something 'bland' like ricotta could have such a beautiful taste; it's milky and refreshing and almost sweet. And at $5 a kilo, it's cheaper than buying the tubs from the supermarket. Give it a try next time you're at a deli or market. I also used a bottle of tomato passata, rather than going to the effort of making my own tomato sauce, which I thought worked well, but home-made tomato sauce will always be better. Oh yes, and I didn't have pinenuts, so I used walnuts, which I dry toasted. Very tasty.

As you can see below, I topped my version with some brown breadcumbs I had malingering in the fridge, and a few nice black olives, and my dish was big enough that I took this to work for lunch several days straight (although I did get a bit sick of it...). Incidentally, that brown goo you see on top of the rocket leaves is not engine grease but a rather delicious salad dressing of mustard, honey, balsamic vinegar, salt and olive oil. Verrry nice!
Read on for the recipe:


Eggplant Rollatini

From 'Everyday Italian', Giada de Laurentiis
(I halved this recipe to create the amount in the photo above, which would be generous for 3-4 people)

3 medium-sized eggplants (about 1.8 kilos total)
Sea salt and freshly ground black pepper
Can vegetable spray
900g ricotta cheese
2 large eggs, lightly beaten
1/2 cup (115g) shredded mozzarella
8 tablespoons (115 g) grated Parmesan
3 tablespoons (45g)toasted pine nuts
20 fresh basil leaves, chiffonaded
Extra-virgin olive oil, for drizzling
2 cups fresh tomato sauce (I used a bottle of passata)


Preheat the grill pan and preheat the oven to 190 degrees C.
Place a rack over a large baking sheet. Cut the 2 ends off the eggplant. Cut the eggplants lengthwise, into 1/2-inch thick slices.
Spray hot grill pan liberally with vegetable spray and then place eggplant slices on the grill until lightly browned on each side and tender, about 4 minutes per side. Remove slices from the grill pan and allow to cool.
In a large bowl, beat eggs until lightly scrambled. Mix the ricotta in with the egg. Add mozzarella, 3 tablespoons of Parmesan cheese and toasted pine nuts and gently combine. Fold in basil just to combine. Do not overmix.
Place a tablespoon of the cheese mixture on 1 end of the eggplant and roll up tightly. Place the eggplant rollatini into a greased (with olive oil) 33 by 22-cm baking dish, seam side down. Continue with remaining eggplant.
Evenly distribute the tomato sauce on top of the eggplant rollatini. Season with salt and pepper. Sprinkle with remaining 5 tablespoons of Parmesan cheese and bake for 15 minutes. When cooked, drizzle the top with extra-virgin olive oil.


Continue reading

Tuesday, September 06, 2005

Chocolate Chip Walnut Cookies...the big questions asked


I'm not happy. Oh sure, they look good. And the taste was great. But the texture...too crispy! Not chewy enough. I seem to have a hex on me which prevents me ever making a really good chocolate chip cookie; one that is crispy without and chewy within. And it's not for lack of reader suggestions and comments from the last time I aired my woes. I pulled these out after 12 minutes, when they looked done, but still gooey in the middle...but just a few minutes of cooling sent them crisp and crunchy. Hmmm.

There seem to be so many variables which can affect the texture of a chocolate chip cookie and make it crispy; oven temperature too high; baked for too long; too much butter; too much sugar; rolled oats instead of quick oats; plain flour instead of cake flour.....I'm sure the list could go on.
I got this recipe from Nic at Baking Sheet, and I would like to stress that it is a great recipe; I just seem to have problems with all choc chip cookie recipes. The taste is fabulous, and they are very addictive. In fact, when my tasters had a go this evening the majority said they loved the texture and wouldn't want them any chewier.

But I do.
I want to make my perfect chocolate chip cookie, and with the same vigour and passion for research displayed by Jeffrey Steingarten, I want to have an ongoing chocolate chip cookie baking project in which I change the variables. Next time I try this recipe I want to reduce the amount of white sugar and butter a little. The white sugar added to the crispiness in my opinion, as well as making them just a tad too sweet for my taste. And the butter seemed a bit excessive, leaving scary-looking wet, greasy UFOs on the paper in my biscuit tin. I think a smaller amount of butter may reduce crispiness, but hopefully not create too much cakiness.
Also, I don't know about the type of oats I used. I used the bog standard ones we get here; "rolled oats", but I think what they use in American recipes is a more broken-up, finer textures oat; perhaps giving my oats a quick whizz in the food processor might help? Nic did suggest this if you don't have 'quick cooking oats'. But how do you know if your oats are quick cooking or not?
I also lowered the oven temperature by 10 degrees C, but I think I might lower it even more to about 150C. I've heard that fan forced ovens should be lowered by about 10C anyway for any baking recipe, and I've heard rumous that our oven (a Gaggenau) can be lowered even further - up to 20C. But that does seem a lot, and I worry about pulling them out too early and having wet, soggy cookies (the other problem I often have....).

What a complaining Nancy I sound! These biscuits were good, and I've just come back from dropping them off to A. for him to take to work tomorrow (yes, these were the second installment of "Baked Goods For The Mystery Workplace) where his father sampled one and declared it really good. I've just become a bit too obsessed with this 'issue'.

You know, I have no doubt that if I didn't have this blog and have become so interested in cooking I wouldn't have nearly the same amount of passion about this! In many ways this blog has been excellent for experience and how I strive for new heights, but it sure it can be damn annoying at times. I get the feeling that some people tonight just wanted to tell me to get over it! :-) It could just be an overactive imagination...but I know I can do better!
Read on for the recipe:


Chocolate Chip & Walnut Cookies
Adapted and converted to metric measurements from Baking Sheet

Makes 40 cookies

250g flour
50g quick cooking oats
1 tsp bicarbonate of soda
1 tsp salt
225g unsalted butter, softened
165g white sugar
175g brown sugar
2 tsp vanilla extract
1 egg
1 cup chocolate chips
1/2 cup chopped walnuts
1 tsp cinnamon

-Preheat oven to 175C and line a few baking sheets with parchment paper.
-In a medium bowl, whisk together flour, oats, baking soda, cinnamon and salt.
-In a large bowl, cream together butter and sugars.
-Blend in vanilla extract and egg.
-Slowly add in the flour mixture until nearly combined. Add in chocolate chips and walnuts and stir until dough is uniform in color and distribution.
-Drop by rounded tablespoonfuls onto prepared baking sheets.
-Bake at 175C for 11-13 minutes, until lightly browned. Remove to a wire rack to cool.


Continue reading

Saturday, September 03, 2005

Unrefined honey and Honey Snaps


At the university where I work every Thursday is market day. On a nice sunny day it's a pleasant way to spend some time after you go out to buy your morning caffe latte. To be honest, there's not a lot there that really grabs me; there's a reason it's known to many as the 'Hippie Market'. There's lots of beads, tie-dyed scarves and used saucepans sold from the back of Kombis by people in crochet hats, but there are some great second-hand book stalls (I bought a hardcover of the epic A Suitable Boy for $14!)
The most exciting thing for me last week was that the Honey Man was there. I first saw him the day I came for my job interview, and made a note that if I got the job, I'd keep an eye out for him. Each week I looked, but he didn't come back until last week.

The honey man sells raw, unfiltered, organic honey from the Yellow Mallee Gum - a Eucalypt from North-Western Victoria. I don't know if he keeps the bees himself, but after tasting his honey I want to find out more about him. His honey is 'strained at beehive temperature' and 'retains all the natural goodness of pollen, propolis and enzymes' and it tastes amazing. It's dark and cloudy with a grainy texture full of little 'bits' - bits of beeswax? pollen? It's almost crunchy! I don't know, but it made me realise how much honey with texture tastes so much better than the clarified stuff. And the flavour - wow! I stuck my finger in for a taste when I got back to my desk, and for hours afterwards whenever I moved my hand I could smell the honey. I'm sure my workmates were sneaking worried looks at the weird girl who kept sniffing her fingers. It reminds me of the of the pieces of honey in the comb my grandmother used to to buy when I was a child.
And what makes it even more of a winner? Half a kilo of his honey will cost you only $4.95!! Amazing. .

Tasting honey like this reaffirms how much I don't like the Capilano honey they sell in supermarkets. That stuff is overly sweet and refined, whereas this natural stuff has an aftertaste of trees and beeswax and nature in general. I only wish Mr Honey Man also sold the Mole Creek Tasmanian Leatherwood honey, which is my favourite. If you haven't tasted it, imagine the strongest, woodiest honey you can imagine. Fabulous. But it's expensive.

So, while sitting at my desk that afternoon I felt inspired to bake something with my new honey as soon as I got home. The best place I thought of for honey recipes was the roundup on Baking Sheet from the recent Sugar High Friday she hosted. And it was there that I found just what I was looking for, from a fellow Australian blogger - Grab Your Fork. Her recipe for Honey Snaps looked really simple and had so few ingredients that the flavour of the honey would really show through.

I seem to have hit a winner with really easy recipes recently, as these were just made in a saucepan and dolloped onto a cookie tray. Even with the most unsteady dolloping hand, the biscuits spread into perfect circles during cooking. I put a blanched almond on each biscuit and, taking them to work the next morning, everybody was impressed by how professional they looked. This is a perfect case of elegant simplicity! These are thin and fairly delicate with a really crispy texture and would be perfect for those oocasions which require fine bone china teacups and saucers. They taste a little bit like a ginger snap, due to the ground ginger - which I actually doubled. And as Augustus Gloop commented, they are incredibly addictive. I found it hard to stop at 2....or.....erm....5. It's the perfect thing if you want to show off your good honey.
Read on for the recipe:


Honey Snaps
With thanks to Augustus Gloop

50g butter
2 tablespoons sugar
3 tablespoons honey
1/2 cup plain flour
1 teaspoon baking powder
1/2 teaspoon ground ginger

-Melt butter, sugar and honey together in a saucepan.Remove from heat.
-Add flour, baking powder, ginger and stir until mixture is smooth.
-Drop teaspoon lots onto a cold oven tray, leaving enough room for the mixture to spread to double its size.
-Bake at 180C for ten minutes or until golden.
-Leave on tray for a few minutes to cool before removing to a wire rack.
Makes 20.

August Gloop notes: Make only enough batter that you can bake at a time, as the mixture can dry out and reheating just cooks the dough. However, the recipe is so easy to make up that doing repeat batchs of dough is no trouble.


Continue reading