.comment-link {margin-left:.6em;}

Esurientes - The Comfort Zone

Wednesday, August 31, 2005

Swirly self-frosting cupcakes


Apparently the bloke was big and burly and used power tools. Apparently he commented on the swirls.
'Nice swirls' he said.
Not quite what you'd expect.
But when it's an employee of your boyfriend's new workplace, somehow it seems less mysterious. See, A. began a new work contract recently and one of the first questions the others in the team asked was:
"So, do you cook?"
To which he replied, "erm.....yes"
"But do you bake? We have morning teas here and we bring things we've baked."
"Well, I don't do that stuff much. However, my girlfriend is right into all that!"
"Excellent....!"
So, that's how I was lured into baking cupcakes for people I've never met. Including burly men with power tools. Yet, I see this as a win-win situation: I have a long list on this computer of 'baking recipes to try', to which I add when I see something interesting. Which is pretty often. But I have not so many opportunities to make baked goods and it's really not a good idea to have yummy cakes and muffins sitting around at home, ready for snacking as I walk past the kitchen. I thought I had a willing recipient with A. but when he recently said "I can't eat as much cake as you give me!" I guessed I had to slow down a bit. That left me with a sudden dearth of blogging opportunities too; usually I have a backlog! So, when A. told me that he had a team of willing guinea pigs to try my baking recipes, suddenly I had a good excuse to get friendly with the butter and sugar again. Just nothing with too many expensive ingredients...especially if I don't get to eat it!

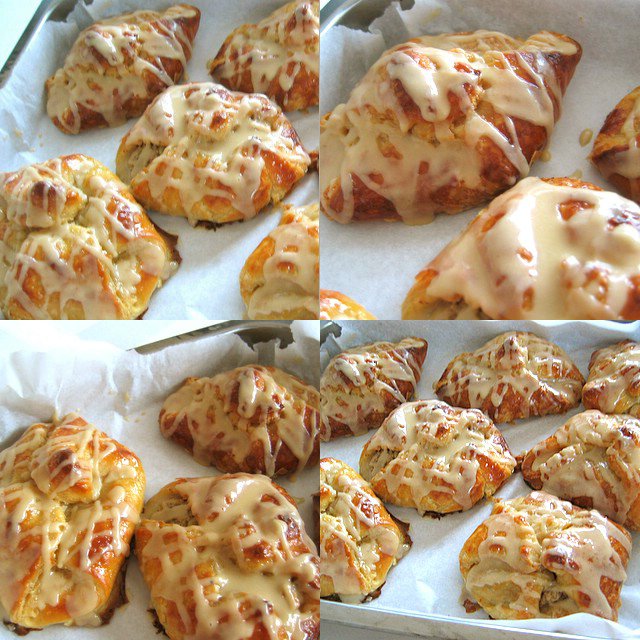
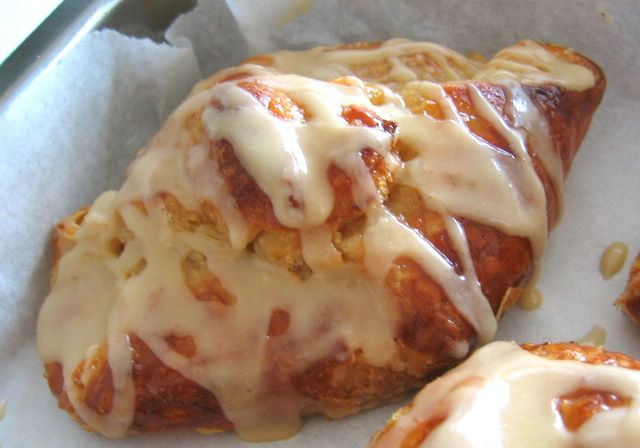
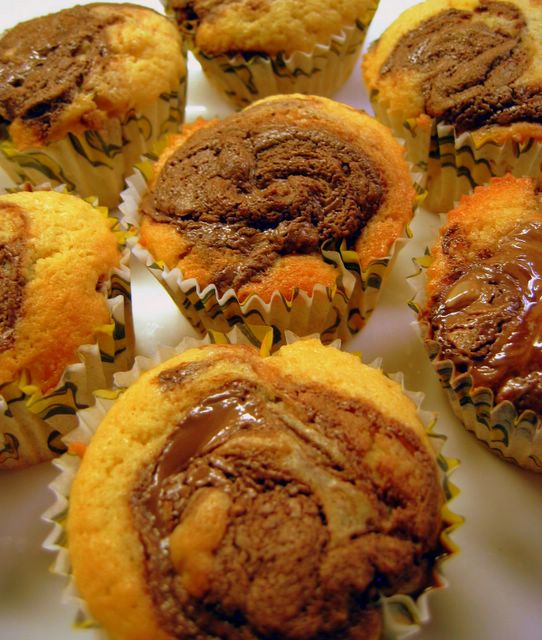
These were my first offerings to the mystery workplace, and they're something that caught my eye on Nic's website. In turn, Nic got them from a fellow Australia, Donna Hay! They are a simple, very buttery vanilla cake swirled with a topping. The original recipe used peanut butter, which Nic substituted for Nutella (yum!!!). I didn't have Nutella, but I do have a jar of the most wonderful stuff - dark chocolate peanut butter. Now, peanut butter is not something I like. Sure, I enjoy the flavour when it's cooked in things, but I hate it on its own. I can't abide that horrible pasty, gummy texture that sticks to the roof of your mouth. It definitely not something I would spread on toast. However, the first time I tasted this Kraft Nuts About Chocolate I was transported. This is some top stuff. And it's DARK chocolate and dairy-free. Seriously, people, go out and buy some of this stuff. I actually think it's not been selling too well and might be withdrawn from distribution, so I double my plea. Try it!

This recipe is extremely quick to make. I only had a small window of time between getting home from work and going out to rehearsal, and these are great for when you're time pressed. I walked in the door at 5.30 and had these in the oven by 5.50 -that's some quick recipe! I actually found swirling the peanut butter a bit difficult, even after I'd warmed the jar a bit. Even though Mr Power Tools complimented my swirls, I thought I could do better.

The taste of these is excellent. The cake is very buttery and soft, and the chocolate peanut butter rippled gooeily through, giving a real peanutty flavour. Very moreish. It made me think that you could use all kinds of different spreads for the 'frosting': jam...golden syrup...Milo...Appelstroop (that one'd be brilliant!)
So, apparently these were a big hit at A's workplace and they've passed on the message that they'd be happy to receive any baked goods from me in the future, even if they're not photo perfect. :-) Maybe next week I'll try some biscuits.....
Read on for the recipe:


Chocolate Peanut Butter Frosted Cupcakes
Adapted from a post on Baking Sheet, and Donna Hay.

140 grams butter, softened
3/4 cup white sugar
3 eggs
1/2 tsp vanilla
200 grams sifted plain flour
1/4 tsp salt
2 tsp baking powder
~1/3 cup Kraft Nuts About Chocolate (or other chocolate peanut butter spread), slightly warmed

Preheat oven to 165C.
Line 12 muffin tins with paper liners.
Cream together butter and sugar until light, 2 minutes.
Add in eggs one at a time, until fully incorporated. Don't worry if the batter doesn't look smooth. Add vanilla.
Stir in flour, salt and baking powder until batter is uniform and no flour remains.You may need a few splashes of milk here to loosen the batter very slightly.
Fill each muffin liner with batter. They should be 3/4 full.
Top each cake with 1 1/2 tsp chocolate spread. Swirl the spread in with a toothpick or knife point, making sure to fold a bit of batter up over the spread.
Top with some crushed peanuts, if desired.
Bake for 20-25 minutes.Remove to a wire rack to cool completely.
Makes 12.


Continue reading

Sunday, August 28, 2005

Eurochoc!


Hey, that could be a Superhero name!
My friend, Beck, returned today from a month's holiday in Europe - Vienna, Florence & the cinque terre and Paris. Nice! And here's my chocolate booty....because you can't go away to Europe and not come back with European chocolate for your friends, can you?? :-)

She picked up all these things in Paris, on her final few days so they wouldn't melt. Some unusual Lindt flavours we don't get here in Australia; White with vanilla and caramel meringue with whole hazelnuts. How exciting! Plus a block of 67% dark chocolate from specialist maker Debauve & Gallais (founded 1800) made with cocoa beans from St Domingo. I'm looking forward to this one.
I also got a few small choc squares from Angelina's, where she said the hot chocolate almost rivalled that you can get at Brunetti's in Carlton. Lol! And she says she had the best tasting cake in her life there. That's quite some claim.
Underneath, a Kinder Happy Hippo, which seems appropriate if you've ever seen me dance... And apparently they have different Mars Bars over there; this one seems to have wafers in it.

But down here it gets most exciting. Look at those things in the bowl. Don't they look just like olives? Yep, that's why thee makers at Les Berlandises call them chocolate olives! Almonds covered in dark chocolate and glazed so the resemblance is uncanny! Very easy to eat lots of these at once.....none left now...
On the right are some gorgeous boiled lollies with really realistic taste also from Les Berlandises. Apple, Peach, Raspberry, Lemon & Strawberry. I've only tried the apple, but the flavour transcends what you usually get in a sugar lolly.
And underneath are some handmade chocolate from Debauve & Gallais. Something with pistachio. Something with silver leaf. Something made with cocoa beans from Venezuela and, interestingly, something that looks like an Oreo! Beck couldn't remember the fillings, so they'll be a nice surprise.
But with a wedding in about an month, where I'm a bridesmaid, I think I'll be hiding all this chocolate in the freezer for a while!


Continue reading

Saturday, August 27, 2005

IMBB: We're living in the Seventies!


See also: Fried Green Tomatoes, deep-fried Mars bar and deep-fried boiled eggs for more oily delights!

Non-Aussie readers may not get the Skyhooks reference there. If you did, you'll end up like I am now with the phrase 'We're living in the SEVENTIES! da da daaah daaah daaaaaah dah! dah!!' on repeat in your brain for the whole night. Why? Read on...
The theme for this month's Is My Blog Burning is hosted by At Our Table with the theme of "Winter's Flying, let's get frying" (yes, I used the alternative southern-hemisphere title). I actually forgot about this until Friday afternoon, and I wondered how I could incorporate something fried into our already planned roast chicken dinner. The chips we'd have? Naaaah.
Then it hit me. We are lucky (?) enough to have a whizz-bang German deep fryer built into our kitchen bench, and we had a small round of Danish camembert in the fridge. I'm going retro! A whole breadcrumbed deep-fried camembert.....heart attack on a plate!! Yay!
Mum heard what I'd be making and started laughing - pointing out how she remembered doing it for dinner parties in the 70s...which prompted the Skyhooks song earworm. Evidently the big pub in the main street of St Arnaud in western Victoria is living in the 70s as well, as I recall seeing it on the menu there....and watching my friend's dad eat it for a entree. A pretty decadent entree, when you're following it with a pub-size steak and chips! Ouch.

So, with the deep fryer heating up, I used my bowl of rye breadcrumbs I'd fried in butter and bacon fat last week for a cheap spaghetti supper. Because, if you're going to deep fry cheese, you may as well coat it in bacon fat-soaked breadcrumbs. No?
Cut the cheese in half and dip into a beaten egg, then vainly attempt to roll it around in the breadcrumbs and make some stick. Seems crunchy fried breadcrumbs are not really the best option for this. Some sort of batter would be better, but anyway....
Make up a dipping sauce for your fried cheese. These deep fried camembert dishes are usually served with some kind of sweet fruit sauce, to cut through the richness of the cheese. So, I made up something using the plum & nectarine jam I made last summer, livened up with a bit of lemon juice and ground black pepper. It worked really well, successfully cutting through the rich gooiness of the cheese.
In the event, I was so worried about the cheese starting to melt through the breadcrumbs or exploding or disintegrating or something, that I possibly didn't leave it in long enough. You can see how I cut the cheese half open to create a sexy food porn image of molten flowing cheese. Which didn't happen. The cheese was soft and warm, but not flowing. Ah well.
It all tasted pretty good as we attacked it with duelling forks, dipping it in fruit jam, and washing down each mouthful with a nice glass of vintage Yellowglen sparkling.

A. had never heard of this 'bizarre' fried camembert concept before, ("is this a uniquely Aussie thing?") but he really did enjoy it. Although, he did point out that anyone who ordered and actually ate a whole one for an entree before ordering a main deserves everything that comes to them in middle-age! We struggled to get through our own small half.
Although, I can't say I really took much notice of him; I was already busy crumbing a chunk of King Island blue cheese to see how that would fry up. Mmmmmm.....deep fried blue cheese.... Smelly. :-)


Continue reading

Friday, August 26, 2005

Word verification

Spammers are going crazy in the comments box at the moment; I received 10 immediately after posting the last entry, so I've had to turn on word verification for comments. I'm sorry - it's tedious, but hopefully won't be too much of a deterrent to leave your comments, because I love reading them!


Continue reading

Thursday, August 25, 2005

Armenian nutmeg & walnut cake


...And it's back to baking. This recipe answers that time-old question of biscuits or cake? Say, in your fantasy world, you have two blond, lisping children (Brady Bunch style), one asking for biscuit and the other wanting cake, and you're just the type of person to indulge them both. Well, I have found your recipe. Do both! And combine them in the one item! Everyone's happy.... If only world peace were this easy.

Yes, this cake combines that urge for a cake, with a biscuit base. To be more specific, it tops a crisp shortbread biscuit base made with brown sugar with a soft, tender cake flavoured with fresh nutmeg and full of walnuts. And it's so easy it can all be done in a food processor. I know I've gone on about 'this cake is the best I've made!' in a few posts recently, but I really do think this one would have to be right up there. In the top 5 this year, at least. So simple, and yet so effective.

What is unusual about this cake, other than the biscuit/cake combo is that it really showcases the spice nutmeg. Nutmeg rarely gets a chance to star on its own, so to taste it so fragrantly in this is an eye-opener. For me it created a real 'wow! So, *that's* what it's like!' moment. Unsullied by any other combination of spices, its unusual fragrance keeps me going back for a bit more.
Until recently I only used ground nutmeg in a canister, but when I tried grating the stuff from a whole nut? seed? it was a revelation. Really, because this cake is a real feature for nutmeg, it's worth your while to grate your own. It's not hard to find; I found 3 of them it in a plastic packet next to the ground stuff in the spice section of the supermarket for about $1.


Last week a friend gave me some photocopied sheets from a recipe book from her old school; she wanted to give me the shortbread and chocolate brownie recipe she used, but on the same page was a recipe for this Armenian nutmeg cake, which took my eye, because it sounded so interesting, and because it used walnuts. I have a 1 kilo bag of them in the freezer, so I had all ingredients at hand for an impromptu weeknight cooking event. Sadly, the recipe in that book lacked most of the details in the method, like what to do with the butter and....ummm....the nutmeg. So, I did a bit of internet research and combined a few recipes. The best one I found used 'proper' baking measurements (by weight) and came from my favourite sugar manufacturers in the UK, Billingtons (who make the spectacular unrefined icing sugar I use).
The base of this is wonderful; I think the brown sugar makes it such a winner. In fact, I would be interested in making my own shortbread biscuits using the ingredients from this base. And the cake is so moreish, especially topped with more walnuts, ground nutmeg and a little cinnamon. I've never tasted a cake combination quite like it before.

I'm not entirely certain of the origins behind the history of this cake. Armenia is north of Turkey and Iran, and previously part of the USSR. Nut cakes are fairly common around the area, I believe, but they are usually denser, heavier creations, whereas this is quite light and delicate. It just doesn't seem rustic enough. I know that probably comes across as terribly unenlightened of me, and I'm happy to receive information about Armenia and this cake to further my knowledge. Further knowledge is always appreciated, and is a requirement of my job nowdays!
But Armenian or a Western approximation of an Armenian recipe, this cake is a definite winner.
Read on for the recipe:

Hopefully this picture clearly shows the shortbread base, and the walnut studded cake!

Armenian Nutmeg & Walnut Cake
Adapted from a recipe on the Billington's Sugar Website

110g self raising flour
110g plain flour
1 1/2 teaspoons freshly grated nutmeg
110g butter
110g Light brown sugar
1 teaspoon bicarbonate of soda
175 ml milk
1 egg, beaten
100g walnuts, chopped

ground cinnamon

This whole cake can be made in a food processor, if you have one


-Preheat the oven to Gas 5/190°C/375°F.
-Sift the flours and ½ teaspoon of the ground nutmeg into a mixing bowl and rub in the butter until the mixture resembles fine breadcrumbs.
-Stir in the sugar. Press half the mixture into a greased 20cm cake tin.
-Combine the bicarbonate of soda with the milk and stir into the remaining dry ingredients with the egg, another 1/2 teaspoon of nutmeg and 3/4 of the walnuts, mixing well.

-Pour into the tin and sprinkle over the rest of the nutmeg and walnuts, and some ground cinnamon.
-Cook for about 35 minutes until golden.
-Cool in the tin for 5 minutes then turn out onto a wire rack to become cold.


Continue reading

Tuesday, August 23, 2005

Grapefruit Marmalade


Well, considering I dislike both marmalade and grapefruit this was an unusual choice for me. But, as I've mentioned earlier, winter in southern Australia equates to a citrus glut. We have lemons and oranges coming out our ears, and when someone came to rehearsal with a box of grapefruit from her tree, for the second week in a row, we were a bit meh about it. However, always with an eye to how I can contribute to our church market stall, I considered making grapefruit marmalade. Even though I don't like it, it's the sort of thing the old dearies love, and it should walk off the table. I hope.

I looked around for a grapefruit marmalade recipe but couldn't really find one that sounded 'right'. In the end I decided to adapt the recipe for Seville orange marmalade from Stephanie Alexander's Cook's Companion. Seville oranges are bitter, right? Grapefruits are bitter. Yeah, it'll work.
Hmmmm, but I dunno. I ended up having to use nearly double the amount of sugar (nearly 3 kilos!!!!) just to take away the awful, awful bitter taste. I think a problem was that the instructions tell you to boil the fruit and cool overnight, but due to general disorganisation and laziness on my part, it was near a week before I got to the next stage. Perhaps I should have discarded the water, and replaced it with some fresh stuff, because I'm pretty sure the water absorbed some seriously nasty bitterness over a week.

My very full pot of marmalade boiling away. It took decent skill to stir this without spillage!

In the end, there was enough sugar added that the marmalade has a fair balance between bitterness and sweetness, but it does err on the bitter side. Being a non-fan of grapefruit and marmalade, I don't know if that is a desirable attribute and something grapefruit marmalade lovers look for, or if it's just vile and nasty.
But, I suppose all will be revealed at the market stall. And with about 12 jars of the stuff, it's either taking it there or.......well....I'm not sure!
I've included the recipe below, for anyone interested in making their own orange marmalade, or playing around with a grapefruit one, like I did. Just make sure you have extra sugar laying around, just in case!
Read on for the recipe:

Seville orange marmalade
Stephanie Alexander "The Cook's Companion"


Seville oranges
water
salt
sugar

Thinly slice fruit, having first removed all pips and central membrane. For every 500g perpared fruit, allow 1.8 litres water and 1/4 teaspoon salt. Simmer fruit, salt and water until peel is soft and easily squashed. Allow to rest for 24 hours in a ceramic or stainless steel bowl.
Next day, measure fruit and water into a preserving pan or large stockpot using a cup. Bring to a boil and for every cup of fruit and water allow an equal measure of sugar. Return to a boil and cook for 25-30 minutes until setting or jelly stage (remember to increase this time when using more fruit). Bottle into hot, sterilised jars.


Continue reading

Friday, August 19, 2005

Dutch music for Dutch art


For those of you in Melbourne who have wanted to go to the current exhibition at the National Gallery of Victoria of the "Dutch Masters from the Rijksmuseum, Amsterdam", or for those of you who have been wanting to see the reburbished NGV International and haven't got around to it - may I suggest that this Sunday afternoon, 21st August, may be a good time? The group I sing with is presenting a free 1 hour concert of Dutch music of the 17th century, inside the 17th century room.
We will perform music of Jan Pieterszoon Sweelinck (who was actually Dutch), as well as Richard Dering and Peter Philips (who were not, but lived there as displaced Catholics) as well as JS Bach's motet Jesu, meine Freude.
It's all happening in the free part of the gallery, from 2-3pm, so if you don't want to pay to see the exhibition, you can still come and listen to us, as you wander through the gallery looking at artwork of the same period. Ok, blatant plug over....


Continue reading

A cheap spaghetti supper


Another recipe from Nigel Slater's 'Appetite'. This one caught my eye, while I was looking for my SHF hazelnut chocolate cake, for its simplicity and generous use of bacon. I'm not cooking much pasta at the moment, but when I was pressed into whipping up a late supper after rehearsal last week, I remembered this. As I not only had lots of bacon, but a knuckle of stale rye bread hanging about, it was the perfect time to give it a go.

This is a pasta without a sauce - it's almost like a hot pasta salad, I guess. The spaghetti is dressed with hot crispy bacon and breadcrumbs you've toasted in a pan with the remaining bacon fat and butter (it's not Nigel Slater unless there's butter...). It's then dressed with olive oil and fresh parsley; the cheapness in the title coming from the idea that these are ingredients you're likely to have knocking about in your cupboards anyway.
It was an interesting combination, and its simplicity - Nigel calls it 'puritanical' - was popular, but for me it was just too dry. Even with a good slug of olive oil, I needed more lubrication. I've always preferred the feeling of wet over dry when it comes to food, so I added a spoon of the extra-light Philadelphia cream cheese I had, and enjoyed the experience much more. Also, I wasn't completely convinced about coating spaghetti in breadcrumbs; just a little bit of carbo loading there! I think it's why A. liked it so much, and I didn't. He could live on carbohydrates and I'm much more of a protein girl.
But, it's a quick recipe and you really can't beat pasta with hot crispy bacon. But, does anybody have any suggestions for what I can do with a bowl full of hand-grated rye breadcrumbs that have been toasted in bacon fat and butter? I got a bit enthusiastic and made too much. They're nice and dry and crispy, like sand, with a distinct rye flavour....
Read on for the recipe:


Spaghetti with bacon & breadcrumbs
From 'Appetite' - Nigel Slater

Per person:
White bread - 2 thickish slices, crusts removed
Spaghetti - a thick handful, about 125g or so
Butter - a thick slice
Olive oil
Bacon - 2 good-sized rashers
Parsley - a small bunch, the leaves only, roughly chopped.

Whiz the bread to rough crumbs in a food processor, or grate it by hand (preferable - because of the different sized crmbs you'll get).
Put on a pot of generously salted water for the pasta, and cook the spaghetti for about 8-9 minutes.
Meanwhile, melt the butter in a frying pan with a little olive oil to stop it burning. Cut the bacon into small strips and fry it in the butter until the fat is golden. Scoop the bacon out with a slotted spoon (important!) into a large, warm serving bowl. Add a bit more butter and oil to the butter and bacon fat in the pan and add the breadcrumbs. Stir them occasionally in the sizzling butter until they have turned golden. Keep an eye on them because they can burn very quickly just when you think they will never brown.
Drain the pasta and toss it with the hot crumbs and any of their butter, the bacon and pasley, and a little olive oil to moisten and flavour.


Continue reading

Wednesday, August 17, 2005

Chocolate!

A new addition to the 'archives by category' section on the right of chocolate! I noticed that the amount of chocolate recipes in the sweet foods & baking section was getting pretty big, and decided to organise them separately. It's currently divided into cakes / cupcakes & muffins / biscuits / brownies & slices and desserts.
I know, cataloguer librarian.....I actually noticed myself wearing my tortoiseshell glasses and a cardigan yesterday and started laughing. Where's my bun? Next I'll be in a beige pleated skirt....
Speaking of which, have any of you seen the Librarian Action Figure doll? I want one!


Continue reading

Tuesday, August 16, 2005

Simple quiche


This quiche, which I made for dinner a while ago was, to be completely honest, nothing extra-special or out of the ordinary. But it photographed so nicely that I'm including it here, in a post I'm quickly writing at work because I won't have time to do a nice, full post about something really exciting (!) tonight. Apologies - but I know that once people stop posting fairly reguarly it's easy to stop checking in to their site. I know I've been guilty of it in the past. I don't particularly want to lose lots of readers, so a posting-I-will-go. The learning curve of the new job is settling down, and I'm feeling more comfortable here, so hopefully more regular posting (and cooking, for that matter) will eventuate.

I had made my own pastry -the excellent pate brisee via Clothilde that I've posted about before- for the little lemon meringue tarts, and had a bit leftover - just enough to stretch into our flan tin. Give it a bit of a blind bake, so the quiche filling doesn't make it too soggy. I made up a filling of eggs, milk, and a handful of frozen spinach I sauteed (from frozen!) in a pan with some pancetta. Toss it into the tin, and bake for about....ohh...I dunno....20-30 minutes? Until the filling is set. I overcooked mine a little, so the egg became a bit rubbery. It's difficult to give accurate times, because so much depends on trial and error. I've learnt that quiches don't take as long as I thought!, but this one was still really tasty.

In fact, I seem to recall eating the last slice of it on the plane to Adelaide for breakfast... It makes me feel a bit privileged opening up some nice home-made bit of cooking on those new airlines which don't include a meal in their price, but instead try to sell you overpriced, overchilled sandwiches which the bloke in the seat next to you always seems to purchase without any sort of enjoyment....I wonder if they'd let you heat things up in their ovens? Hmmmm - now there's a thought. What about a nice roast lamb dinner brought from home?


Continue reading

Monday, August 15, 2005

Melbourne readers Top Brownie & Slice recipes

A few months ago readers of the Epicure section of Melbourne's broadsheet, The Age, read about the best Brownie recipes around and the best recipes for old-fashioned slices. Both articles invited comments from readers and apparently they were inundated with emails offering favourite tried-and-tested brownie and slice recipes. One of the writers has previously gone on the search for Melbourne's best souvlaki and pizza joints based on reader suggestions, so it's always fun when he puts out the call.
The writers at Epicure were encouraged to try baking as many as possible (now there's a job perk - I bet their ingredients were paid for by The Age, too! I bet they didn't have apoplexy at the cost of a packet of ground almonds! This is my favourite theme of the moment....) and, in last week's edition, they included the best of the bunch. There are some pretty gorgeous looking recipes there, so I thought I'd point you in the right direction.

Brownie recipes from Melbourne readers here. (love the brownie cupcake idea)
Old-fashioned slice recipes here. (that caramel, macadamia and hazelnut slice is going to haunt my dreams for many months....)
Free registration required to access The Age. Don't worry - they don't bombard you with spam like some other newspapers I've encountered!


Continue reading

Saturday, August 13, 2005

SHF: Coffee, Chocolate, Hazelnut....brilliant!


Since I bought Nigel Slater's book Appetite a few months ago, I've been wanting to make the final recipe in the book, called 'a great chocolate cake for family, friends, dessert, tea, birthdays...'. What struck me was his description before the recipe, in which he explains that the recipe actually came from Tamasin Day-Lewis (yes, Daniel's sister) who used wholemeal flour and brown sugar in her recipe. Nigel had changed his to plain flour and normal sugar, which sounded great, but the original really intrigued me. I've never used wholemeal flour before, but I'm trying to eat more wholegrain stuff now, so maybe I could convince myself it was a health-conscious cake.....? Nigel added coffee to his recipe, instead of milk, so when this month's Sugar High Friday theme was announced as coffee, I actually had a legitimate excuse to make this cake. Ahem. *cough*. Yeah, convince away.....

I could only find once reference on the internet for Tamasin's original recipe, and that recipe forgot to include any sugar, so I rather doubted its authority. I'm right into 'authority control' now I work as a cataloguer ;-). Although I have a pretty sketchy strike rate when doing my own modifications to recipes - in fact I'm well-known for not following the instructions and wondering why my recipe doesn't turn out - I threw caution to the wind and decided to go it alone.

Maybe I'm throwing off the curse of the experimental cook, but this is truly one of the best cakes I've ever made, and probably one of my top two this year; the other being the spicy chocolate gingerbread. It uses ground hazelnuts along with the wholemeal flour, which gives a really moist texture, but also it's almost grainy with that unrefined flour and nubbly bits of hazelnut. I made this cake on Thursday night without any event in mind to eat it, which is not a wise thing to do when you have a wedding coming up, in which you're a bridesmaid! So, even though I keep sneaking a little slice each time I walk through the kitchen (bad girl!), I worried that it would have dried out by today. But no! This cake is truly rustic and homely, and holds its moisture really well, no doubt helped by the ground nuts and shot of espresso coffee in the mix.

One of the best features is this sandy rubble of topping sprinkled onto the top before baking, which uses some reserved hazelnuts and chocolate from the batter. Doesn't it looks mouth-watering?? I used a chunk of dark couverture from Chocolatier, which was pretty luxurious and allowed me to chop proper chunks of chocolate, which you can't do when you buy a block of Lindt or whatever. The crushed hazelnuts on top toast and roast in the oven, and give the most brilliant flavour. It has a similarity to Nutella, you know, so if you're a fan of that (and who isn't?) you'll love this cake.

The coffee flavour is subtle, and gives a deeper note. You could possibly sprinkle some more espresso over the topping just after it comes out of the oven if you want a bigger coffee flavour. Hazelnuts are my favourite nut flavour, but Nigel suggests that walnuts or toasted almonds could also be used, which might be easier to find (I found my ground hazelnuts in a baking supply store and stored them in the freezer).

This would be the perfect cake to take on a picnic or take for dessert to a BBQ. It's homely and unpretentious, despite the pedigree of its ingredients. It's not the type of cake you'll find served on bone china with a cup of Darjeeling at High Tea, but the type of cake you could feel quite comfortable shovelling into your mouth with your fingers. And I reckon that's its real winning point. Top stuff.
Read on for the recipe:


Wholemeal Chocolate, Hazelnut & Coffee cake
Adapted from Nigel Slater, Appetite p.438.

Nigel says you can make a few changes to the recipe without coming unstuck. He suggests walnuts or lightly toasted almonds instead of hazelnuts. He also suggests adding the finely grated zest of a small orange or even some finely chopped fruit such as dried apricots or stoned ready-to-eat prunes.

250g butter (1 block)
125g soft brown sugar
125g white or raw sugar (feel free to play with these sugar amounts)
4 large eggs
3-4 tablespoons strong espresso coffee
250g wholemeal plain flour
2 heaped teaspoons baking powder
200g skinned hazelnuts, coarsely ground (I used 100g ready ground, and 100g whole nuts)
250g good, dark chocolate - coarsely chopped (it should look like gravel)

23cm springform cake tin (for ease of removing the cake afterwards) or a normal cake tin.

-Line the cake tin with greaseproof paper, even if it is non-stick.
-Set the oven at 180C
-Beat the butter and sugars til they are fluffy and pale, preferably with an electric beater unless you want a real upper body workout doing it by hand
-Add the eggs one at a time, beating lightly between each addition. Don't worry if the mixture curdles.
-Stir in the coffee
-Dunp in in the flour and baking powder and fold them in, then fold in most of the hazelnuts and chopped chocolate, keeping a little back for the top of the cake. The mixture should be quite firm.
-Spoon it into the lined tin and smooth the top
-Scatter over the remaining hazelnuts and nuts
-Bake for about 1h 20 minutes or until the cake is springy. (Mine took about 1.5 hours). Test its donenss by spearing the centre with a skewer. It should come out without any raw batter on it
-Leave for 30 minutes or so before cutting. It is at its best slightly warm and loose textured.

Note: Because I used a combination of ready ground and whole nuts I ground in the processor, I think my cake was a bit more dense than Nigel's. If you want a looser textured cake, I'd suggest you grind all the nuts yourself.


Continue reading

Wednesday, August 10, 2005

Chocolate Chilli Shortbread


Today was the coldest day of the year so far in Melbourne. It actually snowed in the outer suburbs and most of the countryside, which is a pretty rare occurance. Sure, we have mountains in Australia with ski resorts, but they're about 3 hours drive from Melbourne, and many Melbourne kids never see snow except on tv and books. Many people are surprised to discover that there is cold weather and snow in Australia; yep, most definitely. It's not all surfing and stubbies down here!
It was snowing down to sea level over the surfing towns of Lorne and Torquay, and there was hope that the CBD would get a taste. Sadly not, but the day was just icy. Walking to my car this evening, I felt needles of ice in my nose and my lungs were in great protest. My mum went up to Mt Buller this morning to spend a few days with my brother who's working on the ski fields this winter. They had their best snowfalls of the season just as she was tackling the mountain, so she's going to have a great holiday. I love it! Finally I have the winter weather I was looking forward to so much!

So, in acknowledgement of cold, cold weather, here is a hot, spicy biscuit. These are the Mexican chocolate icebox cookies that Nic posted about a few weeks ago. I was really interested by them, and as chocolate and chilli is all the rage at the moment, thought they'd be a good little fashion item. Thing is, I really liked them, so I'll be keeping them in the repertoire! Icebox cookies, where you roll the dough into a log and freeze it, before cutting off slices to bake, seem to be a uniquely American idea, and I've never seen a recipe for such a thing before. They're a great idea, and you can have fresh baked biscuits in a few minutes, if guests arrive (my god, that sounds like something straight out of Women's Weekly).
Nic's recipe, from Maida Heatter -who I'd never heard of until Cathy's quest to bake every biscuit recipe of hers this year-, includes cayenne pepper, which I didn't have, so I subbed chilli powder. Wow - what a hit. 1/2 a teaspoon doesn't sound like much, but gives a real kick. Combined with the black pepper and cinnamon, these are really spicy. The texture is really soft, a bit like a shortbread and really yummy. Rolling the dough into two 9 inch logs did make me smirk. We don't use inch measurements in Australia, so I was left thinking 'what's 9 inches? What's something that's 9 inches long?.........oh. Ahem. Ok...........yeah, that looks about right!' ;-) *snort*. There should be lots of very happy men out there if that's what I'm thinking!

I think the ideal way of serving ice box cookies is as an icecream sandwich. I served them on their own at a party, which was still nice, but I do think they'd be better sandwiching some type of filling. The soft doughiness and spiciness might be a bit much. Obviously, it's not icecream sandwich season down here, so I sandwiched the one above with *gasp*....Philadelphia Extra Light Cream Cheese. Yes, turn your backs and shun me from the True Foodie Community now, but it actually worked really well! The smooth, light tanginess of the cheese worked well with the soft, sweet, spiciness of the biscuits. And they just perfectly complement a steaming hot cup of tea on a cold, rainy Sunday afternoon by the open fire.
Read on for the recipe:


Chocolate Chilli Shortbread
Converted and adapted from Maida Heatter's Mexican Chocolate Icebox cookies

1 1/2 cups plain flour
3/4 cup cocoa powder
3/4 tsp ground cinnamon
1/2 tsp ground chilli powder
1/4 tsp salt
1/4 tsp freshly ground black pepper
170g butter, room temperature
1 cup sugar
1 1/2 tsp vanilla extract
1 egg


Sift together flour, cocoa, cinnamon, chilli, salt and pepper in a medium bowl.
In a large bowl, cream together butter and sugar. Beat in vanilla extract and egg. Gradually add flour mixture until dough is uniform in color and no unmixed flour remains.
Shape in two 23 cm long logs and wrap tightly in plastic wrap or foil. Make sure your wrapping is airtight.
Freeze overnight or up to 6 weeks.
When ready to use, preheat your oven to 190C and bake for 8-10 minutes. Cookies should feel a bit firm at the edges. Store in an airtight container when cool.
Makes ~4 dozen


Continue reading

Saturday, August 06, 2005

Homemade Almond Danish Pastries


About a month ago it was my mum's birthday, and I thought it would be a good time to finally try making the almond Danish pastries in Nigella's Domestic Goddess. Mum loves Almond croissants, especially from Laurent, and I was keen to use up the other half of the processor Danish pastry I'd made earlier.
It would be inexact of me to say this was an ordeal, but it definitely was an advantage that I wasn't working at the time, as it was a multi-day project that involved a series of steps. None of them were hard, but you had to be content with the idea of being close to the kitchen for the afternoon.
I'd say the result was worth it though, as they tasted really buttery and light with a strong taste of almond. Those readers familiar with the strong marzipan-like taste of European sweets will know the flavour in the filling; personally I've never really enjoyed that overpowering almond-essence flavour and I found the taste a little overwhelming. It reminded me of those Italian birthday cakes we bought for dad each year at the 'Continental' bakery that were all rum soaked sponge cake, layered with almond filling laced with almond essence and iced in funny gritty frosting. Yes, I didn't like those much as a child, and the idea of one doesn't inspire me much now. But those who tried these Danish pastries loved the strong almond taste, and said it was just the sort of thing they liked. So, it's up to you whether you halve the amount of almond essence in the recipe or not. I would, but I'm not planning to eat a whole batch myself!

The filling is darn easy to make in the processor, and gave me my first experience of grinding my own almonds. Not something I'd do for anything other than pastries, despite my strong feelings about the monopoly of the ground almond industry in Australia (the cost of one 200g packet is a TOTAL RORT!!! There must be some very wealthy ground almond magnates sunning themselves in the Bahamas by now). The result is grittier and stickier than the packets of ground almonds and wouldn't create the same result.

Here's the toasted almonds ground with icing sugar and butter. Yummy. Try not to eat it all before using it.


Nigella's instructions for folding the pastry around the filling made me go 'huh???' and encouraged me to create my own folding method, and one with which I was pretty happy. Yes, they all look a bit different and some are definitely bodgy, but that's what home-cooking is all about (don't contradict me here....).
After they've had the filling added, and the first glaze is added, and they've sat for 1/5 hours until they didn't double in size and feel like marshmallow (I tell you, I have serious yeast issues), they're ready for baking, then cooling, and then the application of the second, shiny, glaze

So, then you let them cool even further and add the third lot of glaze, which is the sugary drizzles you see in the top pictures. I used my fabulous Billington's unrefined icing sugar, which is toffee brown in colour, and toffee-like in taste. Gorgeous stuff.
So, then you're just about finished. Cut one open to check that it's all ok inside...and maybe just have a little taste test to make sure nobody is going to choke or die.

Mmmm....nice thick almond filling and buttery pastry.
It would be best to serve these as soon as you've applied the final glaze, so they still have the crispiness and warmth of the oven about them, but I was planning to serve them for an early-morning breakfast so that was impossible. I finished them the day before, and chilled them overnight. When I needed them, I steered well clear of the microwave (don't even think of it. You'll just get flabby, wet pastry and sloppy filling) and put them under a hot grill for a few minutes. The pastry crisped up, as did the sugar glaze, which I actually expected would slide right off. A nice bonus.
Currently I still have a few in the freezer for another occasion, and I'm fairly confident that they freeze well, which is good to know as there are not many occasions when you will eat 6-8 Danishes at a sitting, unless you have a house full of guests. If you're going to put in that effort, it's nice to know you can enjoy the rewards later too. I'm really pleased I went through with this, as the results were tasty and the whole process made me feel like a 'real' home baker. :-)
Read on for the recipe:


Almond Danish Pastries
Nigella Lawson 'How To Be A Domestic Goddess'


Pastry:
1/2 quantity of
processor Danish pastry dough, rolled out and ready to use
Filling:
150g blanched almonds, toasted
80g icing sugar
2 tablespoons butter at room temperature
1/2 teaspoon almond extract (or maybe 1/4 tsp?)
1 large egg white, beaten lightly
Egg glaze:
1 large egg, beaten with
2 tablespoons milk
Clear glaze:
100g caster sugar
60ml water
Sugar glaze:
100g icing sugar (unrefined if you have it)
1-2 tablespoons warm water

-For the almond filing: process almond and icing sugar until finely ground. -Add butter, pulse, then the extract and 2 tablespoons of egg white. This filling can be made ahead and stored in the fridge for a week.
-Roll out the pastry into a big square and cut into thirds horizontally, then cut down the middle to get 6 rectangle shapes.
-Place a tablespoon of the mixture on each square in the centre and bring up each opposite corner to meet, so you have a roughly diamond-shaped package. It doesn't matter if filling remains uncovered, as it won't leak out during baking.
-Place on baking sheets and brush with the egg glaze. Leave to rise for about 1/5 hours until they double in size and feel soft and marshmallowy.
-Preheat oven to 180c and cook for 15 minutes until puffy and golden-brown.
-Transfer to a wire rack and let them cool slightly before brushing with the clear glaze; then when they have cooled much more, drizzle over the sugar glaze.
Makes 6-8.


Continue reading

Wednesday, August 03, 2005

Dark, sticky meat for a winter's night


Apologies for the delay in posts. I was, rather suddenly, asked in for interview at a large university here in Melbourne, and was offered a job and asked to begin work within a few days! New jobs are always pretty exhausting and overwhelming, especially when they're in a field in which you require a lot of training, so I've been a bit tired when I come home.
But it's an excellent job with great working conditions, surrounded by the academia I love, located close to home, and just the type of thing I'd dreamt about, and never thought I could get. As a newly graduated librarian, with degrees in both European Studies and Musicology (useful!!), I've been faffing about without real focus for 6 months on on contracts in city corporations; a good experience but not my real interest. And now, in about a year, I will be one of the small population of specialised original cataloguers in Australia. Until then I have a steep learning curve!

But back to the focus of this blog....we've been having terrible, unseasonable, warm, dry, sunny, springtime weather here in Melbourne. It's no good! Sunny days of 18 degrees are fine...in October, but not in August! I like my winter days to be properly wintery; the colder, rainier and icier the better. If you're going to do winter, at least do it properly. I haven't had nearly enough of a chance to get right into comfort cooking and baking. Bah! Having said that, and after spending a day in shirtsleeves, sunning myself on the lawn at lunchtime, I'm very relieved to hear that tomorrow will have a top temperature of 12 degrees with thunderstorms. Yay!!! And next week looks to have a stretch of 10 and 11 degree days - brilliant!!

So, in honour of the properly wintery weather approaching, I'm posting about a meal I made a few weeks ago on another cold night from Nigel Slater's book Appetite. On a whim I bought some oxtail at a butcher a few weeks ago, and threw it into the freezer vaguely wondering how I should cook it. When the opportunity came, I looked through various books and tossed up the relative merits of Stephanie Alexander, Nigella Lawson and Nigel Slater. Nigel won, with the simplicity of his recipe which meant I wouldn't have to nick out to the supermarket and get extra ingredients.
Nigel writes: ...This is one of those dishes where it seems to make no difference how you approach it. The magic here belongs to the food as it slowly does its stuff in the oven, rather than to the meddling of the cook. Sounds perfect; chuck it in the oven and let it do itself for about 2 hours. Oxtail, with its gelatinous bones and highly flavoured meat needs long, slow cooking, while you are free to do other things, content in the knowledge that dinner is simmering away.

The 2 hours turns the meat and gravy into a wonderfully sticky creation; see the before and after oven shots:


After two hours, the vegetables are soft, the meat is unctious and falling off the bones, and the entire bottle of red wine (yes!) that makes the sauce has reduced to a thick, sticky gravy. Mmmm. This meal just cries out for serious sloppy hand eating; it's almost impossible to eat oxtail with a knife and fork. You just have to get your hands and elbows involved, and expect to end up with a face full of gravy searching for the toothpicks and napkins. I'd never order oxtail stew in a restaurant for exactly those reasons.
I added the celeriac we had sitting about in the fridge rather than the celery Nigel specifies, but the whole point of Nigel Slater's cooking is to go by instinct and mood; if you think celeriac would work as well, maybe even better than celery, then I reckon he'd be all for it.

Served with piles of fluffy mashed potato to mop up the gravy, and a refreshing, peppery bundle of rocket on the side for a bit of contrast, you have a very satisfying dinner. It's really the quintessential meal for a cold winter's night, and one to be enjoyed with family and friends. After all, are there many other people you'd feel comfortable witnessing your bone-sucking technique with gobs of mashed potato in your hair?
Read on for the recipe:


Dark, sticky meat for a winter's day.
Nigel Slater Appetite

Serves 2, with enough for seconds.

an oxtail - cut into joints
flour - a little for dusting the oxtail
cayenne pepper
dry mustard powder
ground black pepper
salt
butter - thick slice
carrots - 2 or 3, peeled and roughly chopped
onions - about 2, peeled and roughly chopped
celery - a rib or two, chopped
seasonings - garlic and bay leaves (4 or 5), plus one or two from: orange peel, juniper berries, thyme
tin of chopped tomatoes (optional)
a bottle of strong red wine (like an Aussie shiraz)

-Preheat oven to 160C. Trim the meat of fat and toss each joint into flour that you have seasoned with the cayenne, mustard powder and ground black pepper.
-Melt the butter in a roasting tin and seal the meat. Turn each piece as it colours, then add the carrots, onions, celery and some chopped garlic and let them colour a little, in the rapidly disappearing butter.
-Add the bay leaves, then pour over the wine and tinned tomatoes, and add in any extra seasonings - a few strips of orange peel, 8 or 10 juniper berries, or a few sprigs of thyme.
-Bring to the boil, cover with oiled greaseproof paper and place in the oven for an hour. After an hour the meat will be brown; then turn the meat over and leave for a further hour. The sauce will have reduced and become intensely flavoured; there will not be a great deal of it, especially if you haven't added the tinned tomatoes, but it will be strong and sticky. With the tomatoes, there will be more sauce with less intensity of flavour, but also extremely tasty.
-Serve with mashed potato, crushed tinned cannellini beans, or mashed root vegetables.


Continue reading