.comment-link {margin-left:.6em;}

Esurientes - The Comfort Zone

Thursday, March 31, 2005

Birthday treats


Yesterday was my birthday (28 years old....scarily close to 30) and I spent a very enjoyable day with family and friends - a large part of which was sitting in 2 very excellent restaurants. My mother and I enjoyed a very extravagant and stunning lunch at one of Melbourne best retaurants, Ezard at Adelphi, where we had the 8 course tasting menu. After a few hours to recouperate at home, opening presents and drinking more champagne, I was taken out for dinner by A. to our favourite old-world Parisian bistro/restaurant/bar called The European (they serve their complimentary bread with a pot of aioli, which makes it by that fact alone A's favourite restaurant ever!). I'll post reviews with further details of both places soon, especially of the tasting menu, which was definitely a culinary highlight for me.
I received lots of exciting presents from my friends and family...there's certainly no mistaking that I've taken to the cooking theme with gusto; amongst my gifts were a cookbook stand, a new cookbook (with great photos) and......a complete set of kitchen knives from the Japanese company Global. I'll take a photo when it's daylight again, but these are spectacular! I only wanted 1 knife, but I got 6 and a knife block! I am an extremely fortunate girl, with a wonderful generous mother ('yes, they were fairly expensive!' she commented).
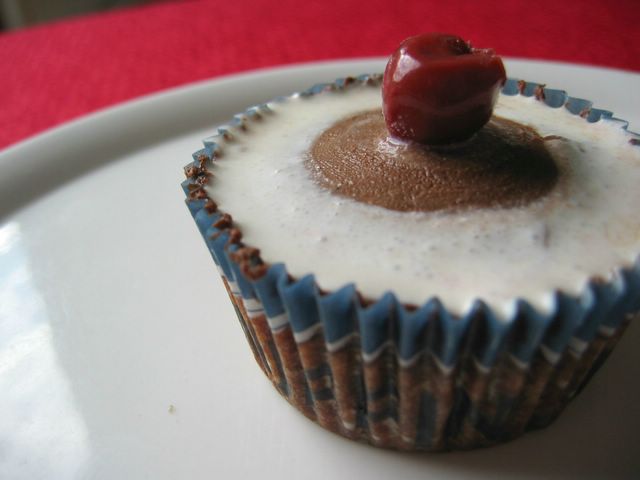
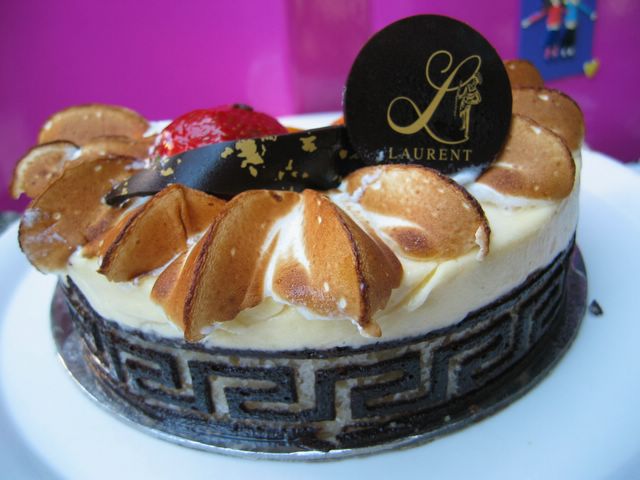
Anyway, the photo above is of the birthday cake mum bought for me, as she proclaimed that it wasn't appropriate for me to make my own birthday cake on the day of my birthday. By then I was basking in the luxury of the day so I agreed. She bought it from the French patisserie Laurent and it is a light, airy concoction of sponge, vanilla mousse, fresh raspberries and mango, and topped with caramelised soft meringue. A lovely way to fill the appetite gap you get in the few hours between a day of fine restaurants. lol! ;-)


Continue reading

EoMEoTE#5 - Triple Cream Brie scrambled eggs with sweetcorn, tapenade & coriander salsa


I was all set to start writing up details of my two fantastic birthday meals from yesterday, when I noticed that it was the end of the month, and I hadn't yet made my eggs on toast! As this months Egg on Toast extravaganza is being hosted by Johanna, whose parents I had the pleasure of staying with in Austria, and who I met in person in London last year, I really wanted to participate.
It's lunchtime here, so I ran into the kitchen and took stock of what was hanging around in the fridge. Considering I came up with the idea for this dish in about 4 seconds, I think it's pretty good!
I scrambled 2 eggs with a little milk and a chunk of excellent Seal Cove Triple Cream Brie from the stunning King Island Dairy, just off the coast of Tasmania, and put two slices of wholemeal bread in the toaster.
I made up a little salsa-type concoction by using an ear of sweetcorn I found in the vegetable crisper, the rest of a small tub of black olive tapenade, and some fresh coriander (cilantro). I wrapped the corn tightly in some plastic wrap and stuck in the microwave for a few minutes; it really cooks corn (and cauliflower) perfectly. I sliced off the kernals and mixed it with the tapenade and chopped coriander. Then I buttered my pieces of bread with the fantastically expensive but fantastically good Danish Lurpak salted butter I bought last week (and could eat by the chunk...mmmmm).

The combination of flavours worked really well; the rich, creamy scrambled eggs were nicely offset by the fully flavoured fresh salsa-creation. In turn the elements of the salsa worked well together - the sweetness of the corn, the saltiness of the tapenade and the freshness of the coriander. An inspired combination!
I only just finished the last mouthful of this. From sudden realisation, creation, photograhy and eating, it took about 15 minutes!


Continue reading

Monday, March 28, 2005

Engrish for foodies!


My mother works opposite quite a few Asian grocery stores and often comes home with interesting and unusual items for me to try. Sometimes we don't have much idea what to do with them, but the thing you see above is a type of dried seaweed, which can be added by the handful to a clear broth, for a light, health-restoring meal (according to the shop owner).

But the real reason I'm posting pictures of it here, is because of the really funny English translations on the back (or Engrish, to be exact!). The timing of this is also funny, as I just read an entry on Food & Thoughts about exactly the same thing (heh! Crumbs of Dread!)!
Here, have a look at what made me start laughing:

Click to enhance
Mmm....gotta get me some red haired vegetables and namely hemp seed oil.
If you can't read it properly, here's a reproduction:

The laver belongs to the red dish a seaweed for red hair vegetables anticipating, the taste is fresh and beautiful, the nourishment enriches. Enrich to contain the protein, vitamin, calcium quality etc. Mineral quality etc. Mineral quality, usually edible healthful.
EDIBILITY METHOD: Tore the laver thin fragment an inside puts just the right amount water boils, putting the laver, joining the salt. Monodosium glutamate, chopped onion, tune up the flavor pour into the hemp seed oil namely.

Yes, clear as a Pacific fog at midnight, isn't it?
I've had a few really funny translations in my time. Last year I had a packet of Taiwanese 'Fry Powder'. This is what was written on the back. I swear I'm not making up these instructions:


-Use half-pak for medium-size family. Mix powder and agitate slowly
-Don't agitate too fast or too long so as to slow a little unsolved powder in the pulp
-Use some scrumbed bun for better taste
(??)
-Tempertarure control is very important for powder frying. Optimum hot oil can send out the pulp drops immediately like surfing (!!)

You'll all have to surf over for some agitated scrumbed bun some time soon.
:-)
For quite a few months, I used this Engrish as my signature on my emails. They are the assembly instructions for a Chinese-made drink holder to put in your car, that my friend bought from a $2 shop. He kept the box on display on his fridge door, for people to get a giggle. He still doesn't know how to put it together:

"Available to use each either of two men and lying on the plale you want. Attach drimking holder on plaleposition using the two-faceD glue. Be safe from all for the size case! If you want to use more than one, pastseach sides together with two-faceD glue...usemethodl !"

Isn't it fantastic!!

Incidentally, have you ever visited the site Engrish.com ? It's hilarious. I was just looking at the Engrish from other countries sections, and laughing very hard! (Today's favourite: the descriptions of 2 dim-sum offerings in a restaurant: 'Dumpling stuffed with the ovary and digestive glands of a crab' & 'Acid Food'. Mmmm....choices, choices.)


Continue reading

Saturday, March 26, 2005

Double Onion, Cheese & Tomato tart


This totally delicious tart was a variation on the Stephanie Alexander Cheese & Onion tart recipe I've made before, from her encyclopaedic Cooks Companion ; a must for any kitchen. I was making some pastry (the perfect pate brisee with dried thyme I found on Clothilde's site) for little tarts to take to a function, and had some leftover. Almost enough to completely line a proper tart pan with a removable bottom, although I didn't quite make it up all the sides and it was a little thin for the creamy filling I made, but I felt very proud of making a tart with a homemade crust for dinner, and not using frozen pastry sheets, as we usually do...

I didn't have enough onions for the recipe so added half a bunch of spring onions (scallions/shallots, depending on what part of the world, or Australia you're in). There still wasn't quite enough bulk to the amount of eggs and liquid involved, but I really enjoyed it that way; it made the filling taste like creamy scrambled eggs; yum! I used a combination of some Havarti cheese from Greece, and a creamy blue cheese I keep in the freezer, because that way it grates really well and you tend to use it in moderation (a good thing when it's expensive and unhealthy, and you have a tradition of eating far too much of it!).
I had some light sour cream in the fridge and used that instead of cream, and then chose to slice a perfect ripe tomato to layer over the top. I think this really made the dish perfect; the creaminess of the filling was perfectly offset by the sweet/salty tomato on top. Early Autumn is the best time for tomatoes in Melbourne, and these homegrown versions did not disappoint.
Served with some rocket I found in the vegetable crisper made this a sophisticated dish for dinner, and there was enough for lunch the next day too!


Continue reading

Wednesday, March 23, 2005

IMBB 13 - Lazy persons' Black Forest Cakes


This month's IMBB has the theme of cupcakes or muffins, which is such a great theme! I'll often mix up a batch of muffins and reguarly use a standard cake recipe to make into little individual cupcakes. People who may be intimidated by a whole cake, are so receptive to individual portion-controlled cupcakes and muffins. They're so convenient when you need to take something to a meeting or function; easy to transport, easy to decorate and easy to enjoy!
This time around I chose to make a variation of the Chocolate Cherry Cupcakes in Nigella's Domestic Goddess. This is a really simple recipe that is very effective; she adds 300g of cherry jam to the chocolate cake batter, which gives it a wonderful flavour. I wondered how it would turn out if I added the same weight of bottled sour cherries roughly pureed in the food processor - essentially turning it into a lazy version of a Black Forest Cake" Hmmm...interesting idea. Topped with chocolate ganache, a dollop of whipped cream and a sour cherry, they might just work really well.

I have a function to go to next week, so I only fully decorated one cupcake for the photo. The others are sitting in the freezer, and I didn't want to make up the whipped cream topping just yet, so I decided to pool some thin cream on the surface with a hole in the centre; kind of the opposite to usual photos of icing dripping slowly from the centre to the outside of a cake... Ahh the extremes I go to just for a good IMBB photo.... :-)
The method for this cake is incredibly simple; it's all made in one saucepan! Do try it - it's difficult to go back to multiple bowls and implements after these sorts of cakes!

Interestingly, despite trying this variation once before and having the cake turn out beautifully light and yet dense at the same time, this time around the cake was only dense and quite heavy. Not in a bad way, of course, but I think one cupcake each will be enough for the people at the function next week. Last time I used cherries soaked in Kirsch....mmmmmm....boozy cherries....so maybe the alcohol had a lightening effect? These dark chocolate cakes are studded with pieces of sour cherry and have a distinct Black Forest cake flavour offset by the cool cream and the sour cherry on top. They're very yummy!

Update, Sat 26 March: How they looked late afternoon today, finally decorated to go out to our Easter brunch tomorrow morning.
Recipe:

Lazy persons' Black Forest Cupcakes
Inspired by Nigella's Chocolate-Cherry Cupcakes

12 bun muffin tin

Cupcakes:
125g soft butter
100g dark chocolate, broken
300g bottled sour cherries (mine came from Slovenia and cost all of $3!)
pinch salt
2 large eggs, beaten
150g self-raising flour

Icing:
100g dark chocolate
100ml double cream
few spoonfuls cherry juice
whipped cream
12 cherries to top

Preheat oven to 180c/gas mark 4
Put the butter in a heavy-bottomed pan on the heat to melt. When nearly completely melted, stir in the chocolate. Leave for a moment to begin softening, then take the pan off the heat and stir with a wooden spoon until the butter and chocolate are smooth and melted. Puree the cherries and juice in a food processor, or similar, until roughly chopped. Now add the cherries, sguar, salt and eggs. Stir with a wooden spoon and when is all pretty well amalgamted stir in the flour.
Scrape and pour into the muffin papers in the their tin and bake for 25 minutes. Cool in the pan on a rack for 10 minutes before turning out.
When the cupcakes are cook, break the chocolate for the icing into little pieces and add them to the cream in a saucepan. Bring to the boil, remove from the heat, let cool, and then whisk - electronically is much better - until thick and smooth. Ice the cupcakes, top with a dollop of whipped cream and stand a cherry in the centre of each.
Makes 12.


Continue reading

Tuesday, March 22, 2005

Hot Cross Buns


These gnarled little creatures are my first attempt at making Hot Cross Buns, a big pre-Easter tradition here in Australia. I never liked them as a child because I hated sultanas and any dried fruit that appeared in anything I was to eat. I'd pick each and every one out. I still don't like them too much, but I like to think my tastes are maturing. They've matured enough to really enjoy my yearly consumption of hot cross buns in the final weeks of Lent.

Considering these buns took all afternoon, I'm a bit disappointed with how they turned out and currently feeling a bit grumpy about the whole thing. They don't look anything like the picture that tempted me in A Spoonful of Sugar. Angela's are burnished golden and shiny with glaze, bursting with the promise of a soft, fluffy interior studded with currants and mixed peel, whereas mine look like rock cakes. They pretty much taste like rock cakes too, although so far I've only tasted half of one straight out of the oven. I can still feel it sitting like a lead weight in my stomach! BAH!

Full disclosure here: this was not only the first time I've made hot cross buns, but the first time I've ever use yeast in baking. I've always wanted to, but steered away from it, somehow knowing that I'd be the type of person for whom yeast cookery should be well avoided. I'm a bit impatient and clumsy, really especially in the kitchen. A bit slapdash...I like to poke and prod at things, and yeast cookery just takes so much time. Witness - I started these at 1pm, and finished at 5.30. That's a heck of a long time to make 12 buns! Admittedly, I did enjoy the process, I just wish that the end result was more impressive.
Who knows where things went wrong? Perhaps I kneaded too roughly or for too long? It never became smooth or silky... I did it for the specified ten minutes, with the technique I've seen on countless TV cooking shows. Perhaps my flour wasn't strong enough? Perhaps I didn't wait long enough to let them rise properly, but you know, I'd left it for nearly two hours, and I only had the entire afternoon free, not the entire DAY! After two hours it had risen a bit, but certainly not doubled itself, and that was even with sitting the bowl in the sun where it was nice and warm...
But I may speak too soon. I will try another later tonight, and give half a dozen to A. who will be very frank with his judgement (he considers himself a hot cross bun connoisseur...and has 5 of Melbourne's top 10 Hot Cross Bun bakeries within walking distance of his house...).
I've included the recipe below, as it evidently is a good one for many people. And maybe with more practice baking with yeast, it'll become a good one for me too!
Recipe:

Extra Spicy Hot Cross Buns - Linda Collister, Bread
makes 12


450g unbleached strong white bread flour
50g stoneground wholemeal bread flour
50g caster sugar
1 teaspoon sea salt
1 teaspoon ground mixed spice
1/2 teaspoon freshly grated nutmeg
50g unsalted butter, diced
60g currants
25g sultanas
25g finely chopped mixed peel
7g sachet easyblend (fast action) dried yeast
250ml tepid milk
1 large egg, beaten
pastry cross

60g plain flour
30g unsalted butter, diced
2 teaspoons caster sugar
to glaze

4 tablespoons milk
3 tablespoons caster sugar

2 baking sheets greased

Put the flours, yeast, sugar, salt and spices in a large bowl and mix well.
Add the diced butter and rub into the flour using the tips of your fingers until the mixture looks like fine crumbs.
Mix in the dried fruit and mixed peel, then make a well in the centre of the mixture.
Add the beaten egg to the well and approximately half the milk. Gradually draw in the flour to make a soft but not sticky dough. Add more milk if necessary or extra flour (a tablespoon at a time) if the dough is too sticky.
Turn the dough onto a lightly floured work surface and knead throughly for 10 minutes.
Return the dough to the bowl and then put the bowl into a large plastic bag and inflate slightly, or cover the bowl with clingfilm. Let rise in a warm spot in the kitchen until doubled in size, about 1 1/2 hours.
Punch down the risen dough a couple of times to deflate.
Divide the dough into 12 equal pieces. Shape each into a neat ball and set well apart on the greased sheets. Slip the sheets into large plastic bags and inflate slightly or cover with a slightly damp teatowel and let rise as before until doubled in size, 45 minutes - 1 hour.
Meanwhile, preheat the oven to 200C /400F / Gas Mark 6.
To make the pastry for the cross, put the flour, butter and sugar into a small bowl and rub the butter into the flour with the tips of your fingers until the mixture looks like coarse crumbs. Stir in 1-2 tablespoons cold water to make a firm dough. Roll out the dough on a floured work surgace to about 3mm thick, then cut into strips about 10cm long and 1cm wide. Uncover the risen buns, brush the pastry strips with a little water to dampen, then arrange, sticky side down, in a cross on top of the buns.
Bake in the preheated oven for 15-20 minutes until golden brown.
Meanwhile, to prepare the sticky glaze, heat the milk and sugar in a small pan until dissolved, then boil for 1 minute until syrupy.
As soon as the buns are cooked, lift them out onto a cooling rack and brush immediately with the hot glaze. (Place a tea towel under the rack to catch the drips!!)
Eat warm or toasted, or freeze for up to 1 month.


Continue reading

Monday, March 21, 2005

Chocolate Hazelnut Fudge Cake


It was A's birthday on Friday and we had a final rehearsal for the Australian premiere/direct radio broadcast, which meant we couldn't have an enjoyable restaurant dinner or night out to celebrate. Bah! It also meant, that he had to supply a cake for everyone at rehearsal (birthday rules, you know!). But there are much worse ways to spend your birthday than singing stunning music and spending the evening with your friends! It wasn't so bad at all.

I had the day off on Friday so offered to bake a cake; it was the perfect opportunity to try something in the long list in my must-try list. Many things on that list are not appopriate to make just for the family or myself, so this chance was great! I chose to try Nigella's Chocolate Fudge Cake with Chocolate Fudge Icing, that I first noticed a year ago on A Spoonful of Sugar. I thought that would go down well with everyone (our little group mainly comprising women and gay men...all of whom seem to love chocolate!). I love Nigella's baking recipes, so this was perfect.

I decided to jazz it up a little with the flavour and texture of hazelnuts. I needed to decorate it somehow, and hazelnuts are my favourite nut. I think I was also inspired by the photo in Domestic Goddess of the Autumnal Birthday Cake (also on the must try list...when I can afford that much maple syrup) where she threw chopped pecans at the sides of the cake.
The cake was very easy to bake, although I was slightly alarmed at the amount of butter and oil that went into it. I couldn't be bothered trying to source corn oil, and a bit of Googling suggested olive oil could be substituted. It seemed to work fine. They took a little less than the time specified to cook through, and they were perfectly moist and very dark coloured, which offset the coffee coloured icing.
The icing horrified me by using the biggest block of butter I've seen! I closed my eyes and reminded myself it was a special occasion. That said, I actually found it to taste a little too buttery and rich. I think it needed more chocolate added to it too; it was a little pale in colour and chocolate flavour. I added some great hazelnut essence I bought at a baking store recently. I guess I could have used Frangelico too, but I was cooking for 20 people here!
The hazelnuts were just chopped briefly in the food processor (I actually started chopping them by hand until I slapped myself around the head which brought me to my senses). I then just threw the chopped nuts at the side of the cake, held my breath in hope and patted them in. They actually stuck, so I was very happy!
This was a fabulous birthday cake, and everybody loved it. I received lots of compliments and even managed to sneak home the one leftover slice to enjoy later that evening.

Read on for the recipe!


Chocolate Hazelnut Fudge Cake
Adapted from Nigella Bites

Serves 10. Or 1 with a broken heart
For the cake:
400g plain flour
250g golden caster sugar
100g light muscovado sugar
50g best quality cocoa powder
2 tsp baking powder
1 tsp bicarbonate of soda
½ tsp salt
3 eggs
142ml/small tub sour cream
1 tbsp vanilla extract
175g unsalted butter, melted and cooled
125ml olive oil
300ml chilled water

For the fudge icing:
175g dark chocolate,
250g unsalted butter, softened
275g icing sugar, sifted
1 tbsp vanilla extract
1.5 tbsp hazelnut essence
150g hazelnuts

Preheat the oven to 180C/350F/gas mark 4.
Butter and line the bottom of two 20cm sandwich tins. In a large bowl, mix together the flour, sugars, cocoa, baking powder, bicarb and salt. In another bowl or wide-necked measuring jug whisk together the eggs, sour cream and vanilla until blended.
Using a freestanding or handheld electric mixer, beat together the melted butter and corn oil until just blended (you’ll need another large bowl for this if using the hand whisk; the freestanding mixer comes with its own bowl), then beat in the water. Add the dry ingredients all at once and mix together on a slow speed. Add the egg mixture, and mix again until everything is blended and then pour into the prepared tins. And actually, you could easily do this manually; I just like my toys and find the KitchenAid a comforting presence in itself.
Bake the cakes for 50-55 minutes, or until a cake-tester comes out clean. Cool the cakes in their tins on a wire rack for 15 minutes, and then turn the cakes out onto the rack to cool completely.
To make the icing, melt the chocolate in the microwave – 2-3 minutes on medium should do it – or in a bowl sitting over a pan of simmering water, and let cool slightly. In another bowl, beat the butter until it's soft and creamy (again, I use the KitchenAid here) and then add the sieved icing sugar and beat again until everything's light and fluffy. I know sieving is a pain, the one job in the kitchen I really hate, but you have to do it or the icing will be unsoothingly lumpy. Then gently add the vanilla, hazelnut essence and chocolate and mix together until everything is glossy and smooth.
Sandwich the middle of the cake with about a quarter of the icing, and then ice the top and sides, too, spreading and smoothing with a rubber spatula. Throw the chopped hazelnuts at the side, while the icing is still wet, so they stick. Decorate with halved hazelnuts around the top.


Continue reading

Friday, March 18, 2005

SHF 6: Chocolate Caramel Slice


These are another very popular addition to Australian bakeries and cafeterias, and very rich and gooey they are too; a crispy, coconutty base, a gooey filling of caramel and a layer of chocolate to cover. I know Caramel Slice is popular in the UK as well, but they tend to use a shortbread biscuit base. In Australia the base we use is usually made with brown sugar and coconut, which makes it a bit more interesting, in my opinion.
I made these in response to an email I sent to A. asking for any favourite caramel recipes. I had immediately thought of an Engadiner Nusstorte (caramel and walnut tart) for this theme...the problem being that I made it for a Sugar High Friday a few months ago (for the nut theme)!! Darn! But, A wrote back and noted that he always loves a good caramel slice (and I can attest to that, having watched him eat an enormous gooey slab of one for breakfast a few weeks back...aiee!), It didn't take long to find a recipe, as I remember my cousin giving me one about 15 years ago; it had been pasted into my childhood recipe book, and despite a few splotches and age spots here and there, her perfect teenage printing was intact. I have no idea where she got it, but it was probably from am Australian Women's Weekly magazine.
I altered the recipe slightly to accomodate adult tastes, and a less-fatty style of cooking. The chocolate layer called for compound cooking chocolate and copha (a vegetable shortening made from coconut, used a lot in Australia). Bleeeachh - no compound chocolate or copha for me thank you - I'm going for deep, bitter, dark chocolate to offset the temple-aching sweetness of the caramel. Additionally, I had run out of Golden Syrup making my chocolate gingerbread a few weeks ago, and only had treacle, so I substituted that, with no problems; it probably just made the caramel even more intensely flavoured. Also, I was lucky to find a tin of skim condensed milk (it uses skim milk rather than full fat), which made the caramel filling far less unhealthy and fatty than it would usually be; combined with cutting down a on the butter called for in the base below, I think I created a lighter version of this rich recipe, which still tasted full fat!
I felt that the filling didn't make quite enough, and would possibly double it next time. What happened was that after baking the filling, a lot of it was absorbed into the base, and after adding the chocolate, it created something that was more 2 layered, rather than 3 layered.
I also made a few mini tart versions of this slice (pictured below) just for an experiment, and these were also extremely successful. I lined a fairy/patty cake tin with the filling, and proceeded the same way as for the slice. It made something that looked a little more elegant and suitable for bringing along to a dinner party (which is exactly what I did with them). I recommend it.
However, these were still receive with great enthusiasm and enjoyment; in fact I don't think I've had such a positive reaction to something I've made....ever. Goes to show really, the simple things can often be the best!
Read on for the recipe:

Chocolate Caramel Slice
Cooking time: 25-30 min and 15-20 min
Base
1 cup plain flour
1/2 cup brown sugar (packed)
1/2 cup dessicated coconut
125g melted butter (this can be reduced a lot. Just make sure it's wet enough to line a base easily)
Filling
60g butter
2 tablespoons golden syrup (or treacle)
1 can condensed milk (400g)
Topping
125 grams dark chocolate

-Grease a slice tray 17x25 cm, light oven to 180C.
-Prepare base: Sift flour, add sugar and coconut. Melt butter and add to dry ingredients.
-Push into pan and even out, bake in oven until golden brown and set.
-Prepare filling: Melt butter and syrup, add condensed milk.
-Pour over base and cook 15-20 minutes. Cool slice.
-Prepare topping: Melt chocolate and pour over top of slice.
-Refrigerate until set, and cut into fingers.


Continue reading

Tuesday, March 15, 2005

Deep Fried Mars Bars, and Fish from Traralgon


Oooooh...the deep fried Mars Bar..the myth and legend that surround this hotly discussed item! Now I must confess I have descended to the underworld and am one of the number that have tried it and.......loved it! I know I know, I'm not supposed to say that. I'm supposed to say it was greasy and fatty and disgusting, and I was prepared to feel all of that, but....it just wasn't! It was SPECTACULAR!
How did I find myself eating half (take note, only half!) a battered deep fried Mars Bar in a fish & chip shop in Traralgon, about 2.5 hours east of Melbourne. Well, it was a public holiday here yesterday, and a sunny 32 degrees so we decided to take a drive to the country. We chose to go east to Gippsland as it is the most lush and fertile part of the state, and near the mountains (the Australian "Alps"!). A post will follow with pretty pictures of little mountain villages.

But a big (70,000 people) country town on a public holiday? NOTHING was open! All we wanted was a simple pub meal - a steak or sausages and mashed potatoes, but it seems all the pubs in the big Gippsland towns have all been glitzified; they're full of flashing poker machines and charge the earth for their mediocre food - $10 for a plate of potato wedges and $19 for some pasta???!!! Evidently the idea of going to the pub in the country equates to going for a 'nice night out' and a 'nice night out; equals flashing lights and brightly patterned carpet. We just wanted simple, traditional pub food, and it's a real shame that doesn't seem to exist in larger country towns any more. (We struck the same problem in Moe at lunch, ending up at a hot, overcrowded Subway; the only thing that was open and affordable)
Anyway, feeling hungry and grumpy we started to the nearest take-away pizza place when we saw The Blue Bay Fish Shop....but this wasn't your average take-away greasy fish & chip shop. It had customer seating and you could BYO wine! Besides fish and chips you could get hamburgers, souvlaki, schnitzels, garlic prawns....and DEEP FRIED MARS BARS! Ok, it wasn't the most atmospheric of places - we ate under fluro lights with the TV showing the swimming and a commentary of "No 68? No 68? 3 fried dim sims and a Chiko roll?" but to us it was perfection.
Look at this fish! Isn't it the absolute ideal of perfect crispy battered fish!

Thin crispy batter over a big piece of Blue Grenadier, served with good chips and a salad (salad hidden by the hugeness of the fantastic fish). They also gave us a jug of gravy to dip our chips into if we so felt (and we did...that gravy was goooood!) And all that for $7.70! Hangs $hit over the rubbish we could have got next to the smokers playing pokies in the pub.

But I'm digressing. You're all here to hear about the deep fried Mars Bar, aren't you? You want to hear of my deep fried fatty experience. Well I'm sorry to say but I'm about to rave. I placed the order with a lot of embarrassment, almost whispering it to the cashier. The cashier looked confued "deep friend Mars Bar? Do we do that? That sounds like something we shouldn't do!" and yelled across the store "how much is a deep fried Mars Bar??" Great. My cover blown. Everyone stared at me in disgust "how could she order such a thing!" (Incidentally, it was $3)
I scuttled back to my table and waited nervously, tapping my foot until A. returned from the toilet. It turned up in a brown paper bag, like one of those dirty magazines they sell in newsagencies.
Here is is, in all its glory:

It doesn't look so great, to be honest, but the first thing I noticed about it was that the batter was really thin and crispy. I was kind of dreading it would be covered in a thick, soggy, salty, fishy tasting batter, but this was almost like tempura - tempura chocolate and nougat! Now that sounds good! I managed to take a blurry shot of it uncut and cut (see above) before A got too impatient and said 'I'm eating it now, ok? I don't want it to get cold!'. Yes, I agree - a cold deep fried Mars Bar would be revolting.

We picked up our half, looked at each other and giggled and took a bite...and our eyes nearly rolled back in delight. It was....INCREDIBLE! I became aware of a murmering, like a litany from the other side of the table: This is fabulous. This is spectacular. This is incredible" only stopping for A. to take another bite.
It doesn't look like the Mars Bar is melted at all in the photo at the top, but the nougat in the middle had become light and soft, and the caramel and chocolate surrounding it had turned into melted chocolate/caramel sauce. The batter around it was light and not oily at all; the sign of a really good fish and chip shop is really hot, clean tasting oil and The Blue Bay distinguished itself there. The other best bit about it was they had sprinkled cinnamon sugar over the top. Yes, CINNAMON SUGAR! Ohmy gawd! I love that! It's just like a cinnamon doughnut but a million times better.
Anyway, it took us all of about 10 seconds to finish each incredible bite, but I can't say we longed for any more. Half a Mars Bar was definitely enough, especially after a meal of lots of fish, chips and salad. I even offered A my last, hoarded bite, but he declined "I just don't think I could do it' he moaned. Yes, half was certainly enough, and I could still taste it half an hour later.

You know, I'm starting to think I could recreate this at home for friends....we have a deep fryer. I'll just have to work on creating the perfect, light, crispy batter. Probably tempura batter. I think bite size chunks of Mars Bars and Bountys served on toothpicks would be awesome!
And The Blue Bay Fish Shop in Traralgon comes with my most enthusiastic recommendations. If you ever find yourself passing through and don't want to spend a fortune on a (crappy looking) pub meal or mediocre pizza, this offers you something a bit more special, for a really good price.
Blue Bay Fish Shop: Southside Central Princes Hwy, Traralgon, Victoria. Ph: 5176 0977


Continue reading

Beer Can Chicken with sticky cranberry 'stuffing'


WARNING! GRAPHIC PHOTO AHEAD!

When I first read the entry on the Passionate Cook's site for Beer Can Chicken I burst out laughing; it sounded so crazy, but she assured us that it created the most incredibly moist, tasty chicken, so I tried it. I loved it so much that when I had dinner at my friend's house last week I decided it'd be an interesting, low-maintenance dinner we could make. I also know it'd make her burst into hysterical laughter.
So, what is it that makes it so funny? So unusual? Well, you stuff a can of beer up its bum! Yep, that is correct - open a can of beer, drink about half of it (don't you love a recipe that tell you to do that?!) and stuff it up the chicken's ar$e...the liquid inside the can heats up and steams the inside of the chicken, keeping it incredibly moist, tender and infused with flavour. Meanwhile the chicken gets roasted standing up, which makes ALL the skin crispy and golden. It's such a great method that I can see myself making it many times in my future!
So....want to see a picture? I warn you...it's graphic!
YES! I want to see a picture of a chicken with a can up its bum!


Doesn't it look hysterical! It looks even funnier when you unhook the wings so it resembles an extroverted dancing chook, but that photo didn't work out so well.....
This time we chose to fill the can with red wine and garlic, instead of beer as I wanted to try a different flavour; it worked really well. I also made up the sticky cranberry glaze from the Passionate Cook's site, but chose to only stuff it between the skin and meat, as I didn't want it sliding off and ending up in the bottom of the pan.
A note; an incredible amount of juices and fat dripped from the chicken into the pan, which meant the roast potatoes we were cooking in the pan with the chicken ended up being stewed potatoes; still tasty, but not crispy!
I can thoroughly recommend this way of roasting a chicken; it not only creates the most moist, tasty and crispy chicken, but is also a talking and laughing point for you and your guests!


Continue reading

Saturday, March 12, 2005

Baked Satay Fish


I had a whole fish from the market; a Skipjack, which is not a fish I've heard of before, but it was only $4 and the fishmonger said it was nice... I decided I wanted to cook it with Asian flavours, in an foil envelope. Baking fish wrapped in foil keeps it moist and locks in all the juices, and it's a really easy low-maintenance way to cook.
Looking through the fridge revealed a few things I liked; a jar of hot red curry paste, a jar of nice peanutty satay paste, fish sauce and coconut milk. I mixed up a spoonfull or so of each, and added coconut milk, lemon juice, a little hoisin sauce and my favourite salty fish sauce until it reached a nice balance of salty/sweet/tangy/spicy. Actually, I have to say that I am really proud of this paste/sauce I created; even my brother who passed by, and won't eat fish had a taste and commented that it tasted pretty darn good!

I tore off a long sheet of tinfoil, doubled it over and created a pouch for the fish - adding the paste I had made inside and rubbing it over the skin. I then stuffed some fresh coriander (cilantro) leaves inside with the paste. We have lots of tender little zucchini in the fridge as well, so I sliced up a few and scattered them around in the sauce that had started pooling around the fish and put it in a hot oven for about 30-40 minutes. I know, zucchini with an Asian dish - yes, it's not an obvious pairing, but it's what I had and I really wanted some green vegetables to accompany the fish and cut through the richness of the sauce.
The smells it sent through the house were stunning, but I was so hungry and impatient for dinner that I made the mistake of snacking on a few bits and pieces I found in the fridge, so when it was ready I could only manage about half! It was quite a rich tasting sauce anyway, especially with the extra coconut milk I drizzled over the top, so I now have about half in the fridge to enjoy for another meal soon! I was really happy with this; it's a cut above my usual meal-for-one ideas, and showed me that I could come up with something pretty good when I let my creativity take over!


Continue reading

Friday, March 11, 2005

"Chocolate & Kahlua Orgasm Muffins"


That's a quote, not necessarily a description of the effect they had on us, although it's a pretty good way of describing these!
There's an Australian author calle Kerry Greenwood who writes most of her books set in Melbourne. She's most famous for the Phryne Fisher mystery books, which are set in the Melbourne of the 1920s. I love reading these - it's such fun to recognise places she describes and know what those buildings you see every day on the way to work were actually used for 80 years ago. The heroine, Phryne, is an incredibly accomplished woman of the 20s - always immaculately dressed in the latest Parisian fashions, fluent in many languages, swift with a pistol, a lightening quick mind and generous spirit. I really recommend them!

However, Greenwood has recently begun another series, also set in Melbourne, but Melbourne of today. The heroine, Corinna Chapman is a 'baker and reluctant investigator', which to me sounds a great drawcard! Corinna runs a bakery in the very centre of the city, in one of Melbourne's famous little city laneways, in a spectacular-sounding building from the 1920s. It's very enjoyable reading her descriptions of a city she (and I) evidently loves so much. Corinna enjoys quite an exciting life in these novels, dealing with murderers, drug addicts, fraud and modern-day messiahs, in amongst getting up every morning at 4am to make her breads and muffins, which sounds delicious.

Each book ends with a few recipes mentioned in the novel, and this particular recipe is one that is mentioned often throughout her second book, 'Heavenly Pleasures" ('somebody has been poisoning the chocolates from the very expensive chocolatier next door of the same name!'). They are muffins filled with a spoonful of warm chocolate sauce in the centre; she charges $5 rather than her usual $2 in the book, so they must be good! Her apprentice, the young ex-druggie Jason, discovers himself to be a brilliant muffin maker, and this is a recipe he invents and perfects throughout the book.
The kahlua is an addition my friend and I made when we were making these for dessert at 11.30 at night. It seemed like such a good idea! We added a few spoons to the chocolate sauce, and drizzled some over the tops of the muffins when they came out of the oven. Surprisngly, considering how profligate we were with the alcohol, we couldn't taste it much at all! I think the chocolate sauce could have all kinds of things added to it - nuts, peppermint, Cointreau - but simple is sometimes the best too.
Read on for the recipe


Chocolate Kahlua Orgasm Muffins
from 'Heavenly Pleasures' Kerry Greenwood

Be careful eating these. Straight out of the oven the melted chocolate can burn your tongue, like the hot jam in a doughnut. Refresh them when cold with 20 seconds in the microwave.

For the muffins:
2 cups self-raising flour
1/4 cup cocoa
1/2 cup brown sugar
125g melted butter
2 eggs
1 cup milk

For the filling:
200g bittersweet chocolate
1/2 cup thickened cream

Preheat the oven to 200C and grease 12 muffin cups.
Make the filling by melting the chocolate and cream together, either 2 minutes in a microwave or just stir it in a saucepan over the stove until it melts and combines. Set it aside.
For the muffins, mix the flour, cocoa and brown sugar together in a large bowl.
Using a separate bowl, mix together the butter, eggs and milk. Pour the egg mixture into the flour and slap it about a bit (do this quickly).
Using a metal spoon, put a glob of muffin mix into the tins, filling them less than halfway. Then put a glob of filling into each tin, then top with the rest of the muffin mix. You now have muffins with a spoonful of chocolate sauce in the middle of each one. Do this quickly, or they will still taste nice but they won't rise.
Shove into the oven and bake for about 12 minutes (you should know how your oven works). They are cooked when they spring back when poked.


Continue reading

Tuesday, March 08, 2005

Archives & Indexes

Last night I spent the evening at home creating an index of my archives - can you believe the glamour of my life? Seriously, I'm happy I did this, as I know when remembering a recipe on someone's blog, it makes it a million time easier to find it again (and other ones that take your fancy on the way) when they have a useable index.
So, I currently have 4 categories: Savoury Foods (covering entrees, mains, soups, vegetables etc.), Sweet Foods & Baking (covering, well, just that - all the good stuff!), Events (my IMBB, SHF, WBW entries) and Random Tastes (all miscellaneous entries - anything from where to find the best chocolate truffles in Melbourne to my ambivalence towards expensive French unsalted butter).
Just look to your right, underneath the archives by month to find them.
And remember you can always search by word by using the Blogger toolbar at the top of the screen; that's also quite an effective way to search by keyword.
Happy archived reading!


Continue reading

Monday, March 07, 2005

A sight for any (homesick) Australian


Expat Australians the world over....what does these photos say to you? Do your eyes mist up and your heart sigh in longing? ;-) For that matter, past visitors to Australia....do these chocolate bars bring back any memories?
What do we have above? Well, we have a little tableau courtesy of Cadbury Australia, makers of the majority of Australian chocolate treats. Cadbury chocolate is known by Aussies, Brits and Kiwis as tasting pretty damn fine, for commercial chocolate bars and Hershey's can't even compare (although I don't think Hershey's is so awful, really). I'm sure Aussies will be jumping to explain but I'll get in first-
Left to Right:
*Caramello Koala (arguably the definitive Australian-themed chocolate treat. My choice of words was carefully deliberate there!) Giant sized! A chocolate in the shape of a happy koala, filled with flowing, gooey caramel.
*Strawberry Twin Freddo Frogs - Chocolate frogs filled with pink strawberry filling. You either love em or hate em. I prefer the peppermint freddos, with their lurid green filling.
*Freddo Frog - Also giant sized! Cadbury chocolate in the shape of a frog. An Aussie favourite since 1930. The chocolate makes it good. :-)
*Crunchie- Oooh, the controversy. Crunchie was released as a direct competitor to the Violet Crumble, a very popular Australian chocolate bar of honeycomb covered in chocolate. Debate RAGES! It rages FIERCELY over which is better. Staunch supporters of Australian culture always choose Violet Crumble over the perceived imposter. It's also pretty well accepted that the quality of the honeycomb in a Violet Crumble is superior to a Crunchie, but many say the quality of the Cadbury chocolate in the Crunchie is better than the Violet Crumble (now owned by Nestle). I got into quite a heated debate with friends on the weekend about the respective merits, so I'm planning a Crunchie/Violet Crumble tasteoff in the near future. I will blog this event. There will be photos. I will have a clipboard. It will be very serious.
*Cherry Ripe- This is another choccie bar with an Australian heritage. It's cherries and coconut covered in dark chocolate. Despite all that it has going for it, and my love of dark chocolate (there's not enough chocolate bars for dark chocolate lovers!) I don't really go for this as much as you'd expect. I think there's too much coconut and it gets stuck in your throat! But, I ADORE the Cherry Ripe icecream on a stick - cherries and coconut mixed into vanilla icecream and coated in thick dark chocolate. That is bliss.

Why do I have a box of hundreds of Cadbury chocolate bars? Want to see more?
READ ON!


A and I spent last weekend surrounded by many, many boxes of chocolates for a fundraising drive in support of our vocal group. We're planning to tour Europe again next year, and we made a lot of money with chocolate drives last year. Since Cadbury got into the fundraising scene, with their name-brand chocolates, they've been the leaders for most groups trying to raise money. They're easy to sell and you get a profit of 50% of each item you sell. Take a box into work and when it comes to 4pm in a large office, it's not difficult to sell a giant Freddo frog for only $1 to a worker in need of a sugar hit! $1 or $2 (for bigger bars) is affordable and gives the pleasure of good chocolate and the knowledge you're helping your friends raise money for whatever thing they're trying to do (soccer club, drama society, new classroom, European tour...)

So, last weekend we found ourselves surrounded by over $1000 worth of chocolate and a large piece of floor space needed to mix up the contents so everybody had a mixed selection to sell. Besides the things mentioned above, we also had bags of Chupa Chups, bags of mini Easter eggs, Natural Confectionary Company jelly snakes (these taste incredibly good...and they're good for the people who don't want chocolate!) and Summer Rolls/Nougat Honey Logs .
And, you know over $1000 worth of chocolate only packs into 24 boxes. Most of us managed to sell through an entire $60 box in the first week! I can see a few more of these drives to come, and a few more Saturday afternoons debating how many bags of snakes should go in each box while surrounded by thousands of happy Caramello koalas (see below!)

Incidentally, here's a photo of our loungeroom floor right in the middle of the packing. This shows about 1/2 of the stock; there were more boxes behind A, who was sitting there with paper and pen working out calculations (simulatanous equations, no less! I last did them in Yr 10!) of how to divide up the stock...

It wasn't so bad really...anything you can do while watching James Bond's Octopussy on the TV has to be fun!


Continue reading

Friday, March 04, 2005

Roasted Vegetable 'Soup'


Without really having any plan or knowing what I was doing, I created something that was so good I've had it for dinner the past three nights!
We had quite a lot of vegetables in the fridge that needed to be used up, and I had vague ideas of making a vegetable stew type dish. Why, then, I chose to add about half a litre of stock to it, is beyond me. I was obviously in my own personal dreamtime....but lucky for me, what was created was just great!
We had broccoli, pumpkin, capsicum, eggplant, an enormous young zucchini, carrot and a large, long, fat chili (I don't know what sort). So, I cut everything up and decided to saute them in some olive oil and a whole head of garlic, cut through its equator into two halves (I didn't bother peeling it...pah! Peeling...who can be bothered?). I didn't have room for the broccoli, so I dry fried that in another pan until it turned crispy and slightly browned, which gives it a great nutty taste.
So, with the vegetables partly cooked I added a tin of chopped tomatoes (they must be Italian - Australian tinned tomatoes are far too acidic) and about half a litre of turkey & ham stock I had frozen after Christmas, when I boiled up the carcass and bones of our Christmas leftovers...how vey thrify of me. My old Home Economics teacher would smile. I added a few large sprigs of fresh thyme put it into a hot oven for about 30-45 minutes. The smell was incredible; it made our house smell just like an Italian restaurant! At that point, I decided to fry up a few rashers of bacon, to complement the smoky flavour of the ham stock; this was an inspired decision as it made the end result even more flavoursome.
Of course, when it came out the vegetables were too soft to eat as a stew, and there was too much liquid anyway so I took to it with my hand held blender thing. I don't know the universal name for one of those; A always calls it a Stab mixer (pick the German influence) and turned it into a chunky vegetable soup.
Topped off with a dollop of pesto and a knob of fresh goats cheese, this made a superb dinner...good enough for three nights worth. It doesn't look too appetising in the fridge, to be honest, and I've been the only one eating it, so I'm just a leeetle bit over it now....!

Roasted Vegetables straight from the oven...too soft for stew


Continue reading

Wednesday, March 02, 2005

Peking Duck Risotto


This interesting sounding combination is actually a real recipe I found in a book! A book only of risotto recipes! A book we actually own! I think it's the first dish any of us have made from it; coming from Northern Italy, risotto making is ingrained in the family. Having said that, I can count on one hand the number of times I've actually made it myself.
The book, Risotto 'round The World is interesting; it's by an Australian author and has some excellent basic recipes. It's when she starts getting into the weird and wacky combinations (chicken, marmalade, pineapple & coconut milk risotto, anyone?) that my eyebrows start to rise. Hmmmmm. But there are some great combinations in there; I'm just not sure you need a whole recipe book for them. Surely you can just use your imagination? Use a basic risotto technique and combine whatever is in your pantry or fridge?
One of the good combinations, and a real East-West fusion dish is her Peking Duck risotto. Having left over Peking duck from our local shop, which I've mentioned before I decided to use the meat in a risotto for a nice Friday night dinner. It was a good choice, and tasted very nice. Still developing my risotto technique meant that it was a little more gluggy and solid than I would have liked; I prefer a more liquidy risotto. The crispy pieces of duck skin on top were fabulous, though!!

Peking Duck Risotto


1 tablespoon olive oil
1 tablespoon toasted sesame oil
8 spring onions (shallots), finely chopped
400g arborio rice
200ml dry white wine
1 cooked Peking duck (or whatever amount you have)
800ml duck stock (or chicken stock)
4 baby bok choy halved or quartered lengthways
200g sliced water chestnuts
1/2 cup boiling duck stock, extra
3 tablespoons fresh corinader, chopped
3 tablespoons fresh parsley, chopped

Cut duck into manageable portion and strip all flesh from the bones. Reserve skin.
In a saucepan, heat the olive and sesame oils and add the spring onions. Cook gently for two minutes until softened, then add the rice and stir to coat. Add the wine and allow the liquid to absorb while stirring. Begin adding the boiling stock, half a cup at a time, stirring very well after each addition and always allowing each previous quantity of stock to be absorved before adding the next amount. With the second addition of stock, add the bok choy. When half the stock has been used, add the Peking duck and stir to incorporate. Continue adding stock.
With the last addition of stock, add the drained water chestnuts. When all the liquid has been absorbed, remove the pan from the heat. Add all the remaining fresh herbs and mix well. Serve the risotto garnished with crispy duck skin (which you can recrisp by putting under a hot grill for a few minutes...yummy!)


Continue reading